Category: Guide

  • How to Hide Prices in WooCommerce Until Login (Free, Step by Step)

    How to Hide Prices in WooCommerce Until Login (Free, Step by Step)

    Many B2B and wholesale stores don’t want the public to see their prices. Maybe your wholesale prices are private. Maybe you only want approved trade buyers to order. Either way, the goal is the same: hide the price and the “add to cart” button until a buyer logs in.

    WooCommerce can’t do this on its own. Every product shows a public price and a public buy button by default. So you need to add a gate: hide prices from visitors, let businesses apply for a trade account, approve the ones you want, and give approved buyers their wholesale pricing.

    This guide shows you how to hide prices in WooCommerce until login — step by step, using the free B2B Suite plugin. You don’t need Pro for any of it.

    TL;DR

    • WooCommerce shows all prices in public by default. To hide them, go to B2B Suite → Settings → General and turn on “Hide prices from people who aren’t logged in.”
    • Also tick “Also hide the add-to-cart button” so visitors can’t order at a price they never saw. This is WooCommerce catalog mode.
    • Prices are hidden everywhere — shop pages, search results, the product API, and the structured data search engines read. Not just the shop page.
    • Turn on “Let businesses apply for a trade account,” paste the registration shortcode [smb2b_registration] on a page, and choose which group approved buyers join.
    • New applicants see normal retail prices until you approve them under Customers → Applications. Approve by hand (the safe default) or auto-approve. Approved buyers then get your wholesale pricing.
    • All of this is free on WordPress.org. You do not need Pro to run a login-to-see-prices store.

    How the price gate works

    Before you touch a setting, it helps to know how B2B Suite decides who sees what. There are three kinds of visitor:

    1. Not logged in (the public). If you turn the setting on, they see no price and no buy button — just a message you write.
    2. Logged in, not yet approved. They have an account, so they see your normal retail price. They don’t get wholesale pricing until you approve them.
    3. Logged in and approved. They’re in a B2B group, so they see your wholesale pricing.

    So “hide prices until login” and “wholesale pricing after approval” are two separate layers. This guide sets up both. Everything is in one place: B2B Suite → Settings → General.

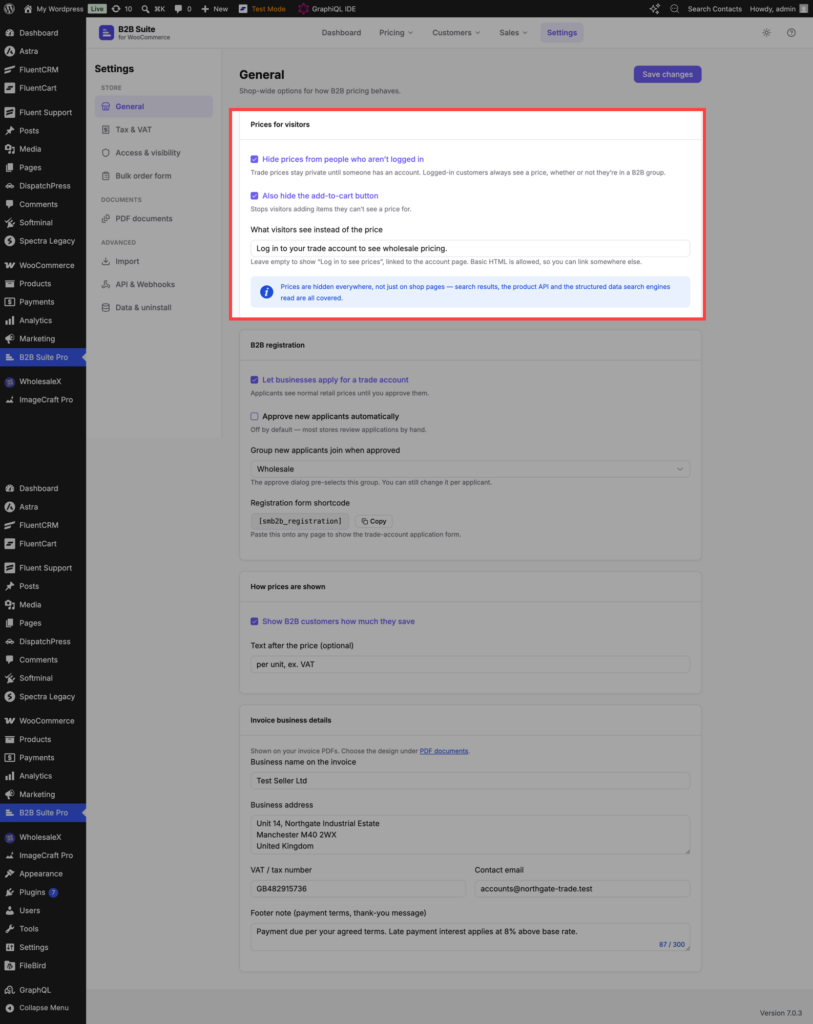
    The two cards you’ll use: “Prices for visitors” and “B2B registration,” both on Settings → General.

    Step 1: Hide prices from visitors

    In your WordPress admin, go to B2B Suite → Settings → General and find the Prices for visitors card.

    Turn on these two options:

    Hide prices from people who aren’t logged in. This is the main switch. Trade prices stay private until someone has an account. (Remember: any logged-in customer still sees a price, so this hides prices from the public, not from your buyers.)

    Also hide the add-to-cart button. Tick this too. It stops visitors adding items they can’t see a price for. Hiding the price but leaving the buy button is a classic mistake that creates support tickets.

    One thing that makes this safe: prices are hidden everywhere, not just on shop pages. Search results, the product API, and the structured data that search engines read are all covered — so a hidden price doesn’t leak out a side door.

    Save your changes. Then open your shop in a private or incognito window so you see it as a guest. The prices and buy buttons should be gone, replaced by the message you’ll set in Step 4.

    Tip: Want to hide prices for only some products or categories, not the whole store? Look under Settings → Access & visibility. (Hiding whole categories from certain buyers — a private catalogue — is a Pro feature. Hiding prices is free.)

    Step 2: Turn on trade registration and add the form

    Hiding prices only works if buyers have a way to apply. On the same Settings → General page, find the B2B registration card.

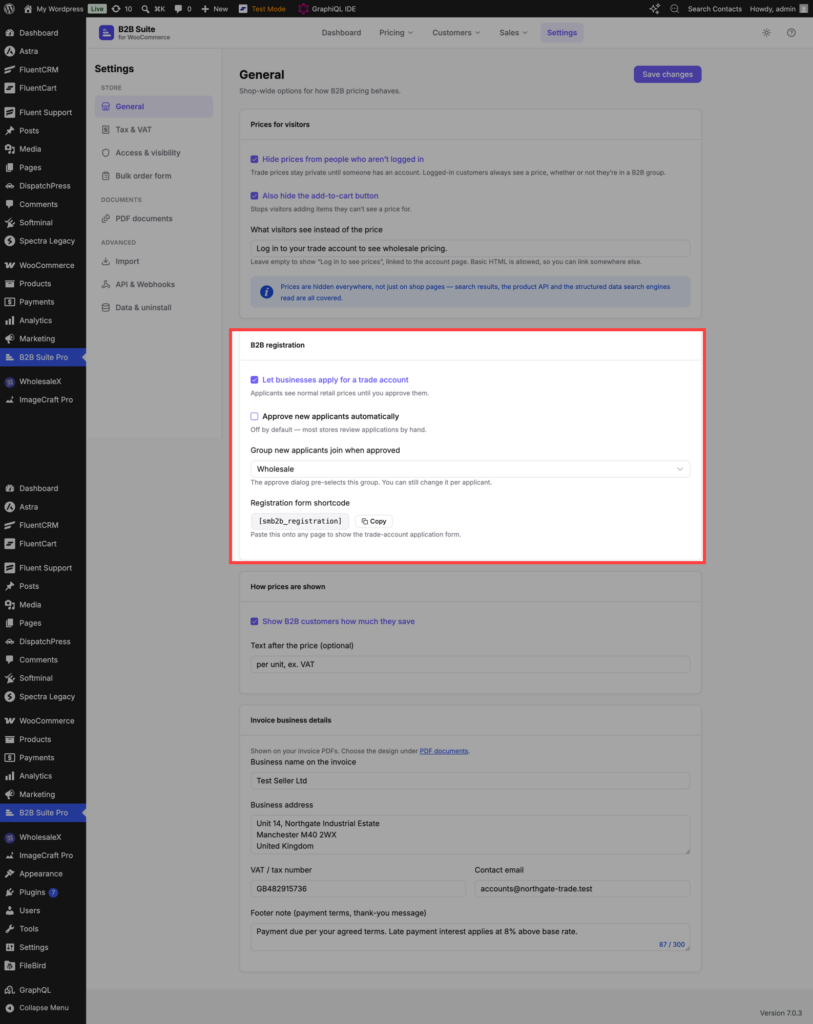
    Let businesses apply for a trade account. Turn this on. Applicants see your normal retail prices until you approve them.

    Approve new applicants automatically. Leave this off unless you really want open access. Off means every application waits for you to review it by hand — which is the whole point of a gated trade store.

    Group new applicants join when approved. Pick the B2B group approved buyers land in — for example, “Wholesale.” That group is where their wholesale pricing comes from. (You can still change the group per applicant when you approve.)

    Add the form to a page. B2B Suite gives you a shortcode:

    [smb2b_registration]

    Create a “Trade Account” or “Apply for Wholesale” page, paste the shortcode, and publish. Link that page from your menu and from the “log in to see price” message. Paste the shortcode into a Shortcode block (or a Custom HTML block) and it renders the full application form.

    Keep the form short — every extra field loses you some real applicants. For most trade stores, company name, VAT or tax ID, phone and address are enough.

    Turn on trade registration, choose the approved group, and copy the shortcode.

    Step 3: Approve or reject applications

    This step turns your shop into a real gate, not an open door.

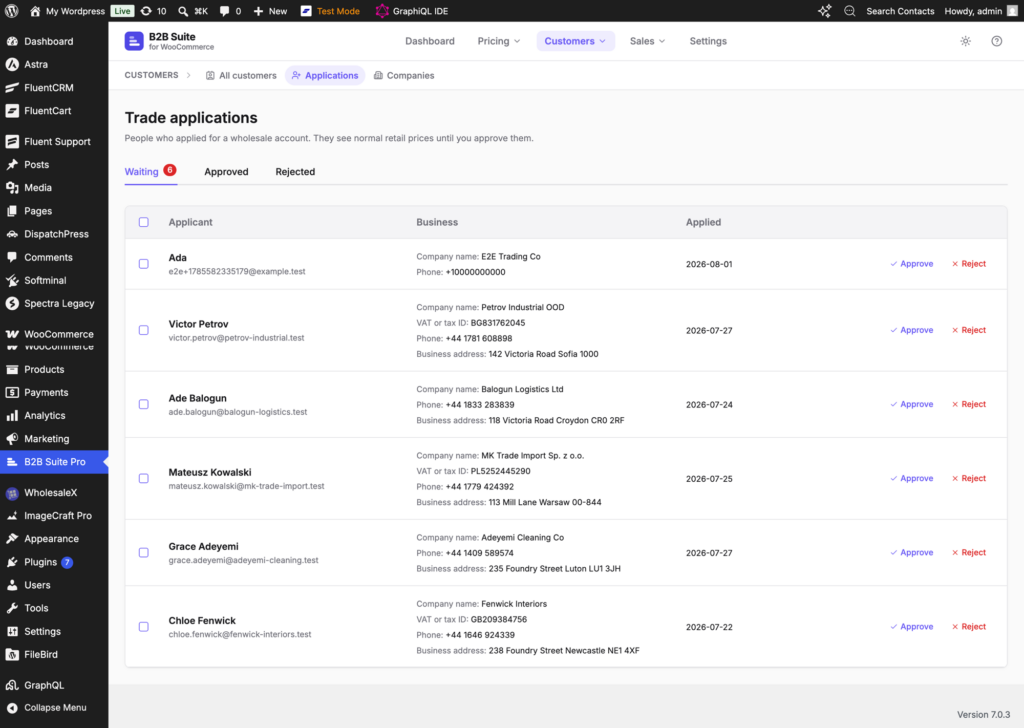
    When someone applies, their account is created but stays unapproved, so they only see retail prices. Their application shows up under Customers → Applications on the Trade applications screen, sorted into Waiting, Approved and Rejected tabs. New ones sit in Waiting.

    Each row shows the applicant and the business details they sent — company name, VAT or tax ID, phone and address — so you can decide at a glance. For each one:

    • Approve — this adds them to the B2B group you chose in Step 2, and from that moment they see your wholesale pricing.
    • Reject — for the ones that aren’t a fit.

    Here’s the full journey: a visitor lands on your shop, sees no prices, applies with their business details, waits for you to approve, and then sees your wholesale prices and can order. That’s a proper login-to-see-prices B2B store — built with the free plugin.

    Approving a new trade account moves the buyer into your wholesale group.

    Step 4: Write the message visitors see

    Don’t skip this. It’s the difference between a shop that looks locked and one that looks broken.

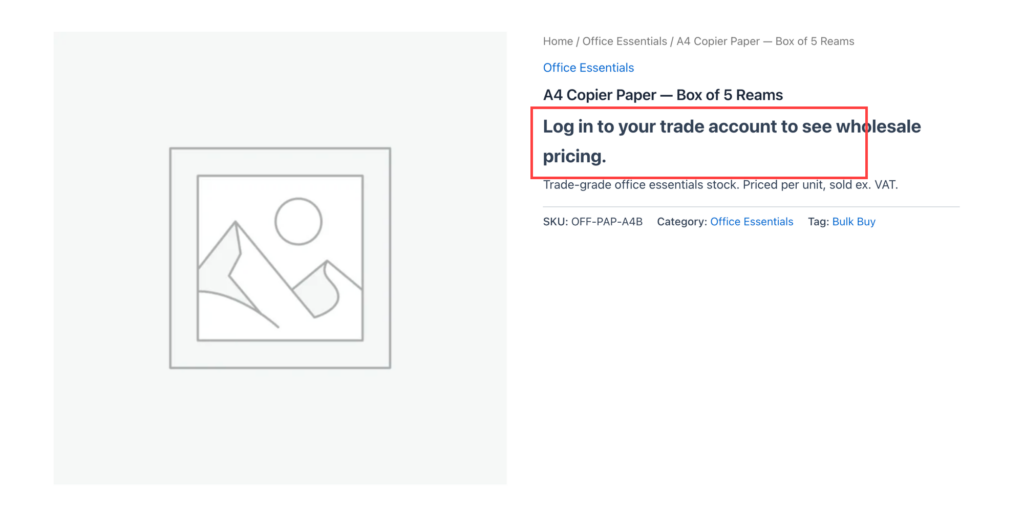
    Back in the Prices for visitors card (Step 1), there’s a field: “What visitors see instead of the price.” This is what shows up where the price used to be.

    If you leave it empty, B2B Suite shows “Log in to see prices,” already linked to the account page. Or write your own. Basic HTML is allowed, so you can link straight to your trade-account page:

    Log in to your trade account to see wholesale pricing.

    A good message tells the visitor exactly what to do next, so a hidden price becomes a reason to register instead of a dead end.

    Now test the whole thing end to end in an incognito window: land as a guest → see the message → click through to apply → submit the form → approve yourself in the admin → refresh and check that prices now show. Five minutes, and you’ll catch any problem before a real buyer does.

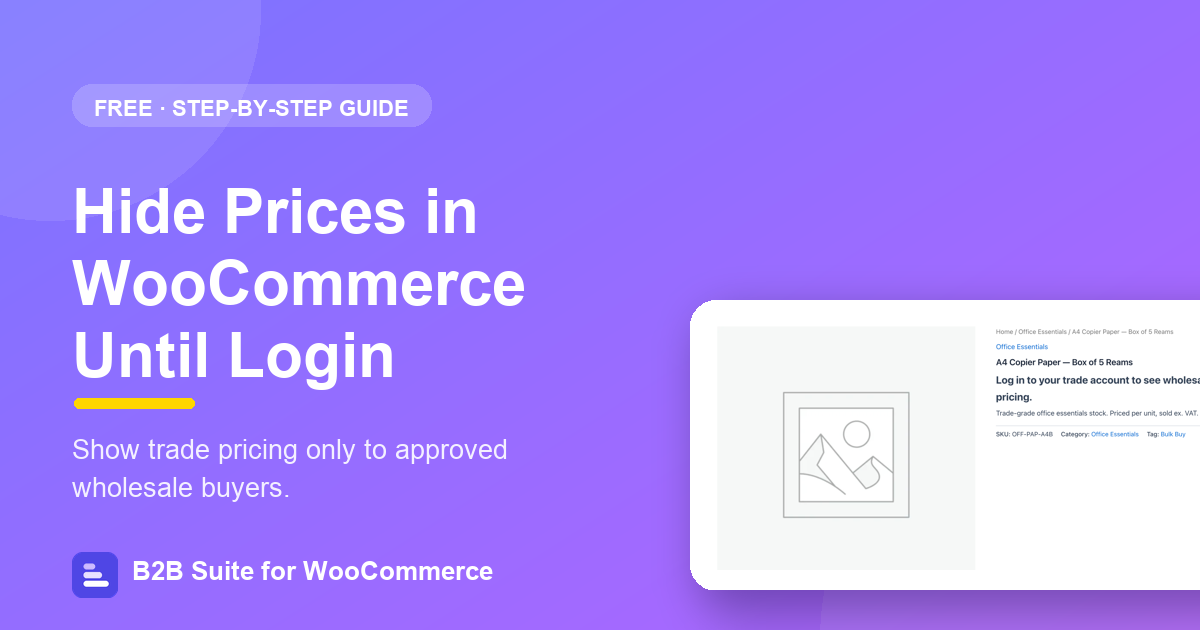
    What a guest sees instead of a price.

    Common mistakes to avoid

    • Hiding the price but not the buy button. Buyers order at a price they never saw. Tick “Also hide the add-to-cart button” too.
    • Leaving the message empty (or blank). “Log in to see prices” is fine, but a message linked to your registration page converts far better than a dead end.
    • Auto-approving everyone. If every sign-up is approved instantly, you don’t have a gate. Keep “Approve new applicants automatically” off unless you want open access.
    • A long registration form. Every field you don’t need loses real buyers. Ask only for what you need to approve them.
    • Never testing as a guest. What you see as an admin is not what the public sees. Always check in a private window.

    FAQ

    Does “hide prices from people who aren’t logged in” also hide them in search and the API?

    Yes. B2B Suite hides prices everywhere — shop pages, search results, the product API, and the structured data search engines read — so a hidden price doesn’t leak out a side door.

    Do logged-in customers still see a price before I approve them?

    Yes. Any logged-in customer sees your normal retail price. Approval doesn’t unlock a price — it moves the buyer into a B2B group so they see your wholesale price.

    Do I need Pro to hide prices until login?

    No. Hiding prices, the “also hide add-to-cart” option, the trade registration form, and approving applicants are all in the free plugin on WordPress.org. Pro adds extras like a fully private catalogue and multiple customer groups.

    Does this hide prices in the block checkout too?

    Yes. B2B Suite controls prices and visibility through one pipeline that covers both the classic checkout and Cart & Checkout Blocks. A gated product stays gated everywhere.

    Can I hide prices for only some products or categories?

    Yes — look under Settings → Access & visibility. Hiding whole categories from certain buyers (a private catalogue) is a Pro feature; hiding prices is free.

    Where do I put the registration form?

    Paste the [smb2b_registration] shortcode onto any page — a “Trade Account” or “Apply for Wholesale” page works well. It renders the full application form.

    Conclusion

    Hiding prices in WooCommerce isn’t one switch. It’s a small, simple system: hide the numbers from the public, let businesses apply, approve the buyers you want, and give approved accounts your wholesale pricing. Done right, a hidden price stops being a wall and becomes a reason to register.

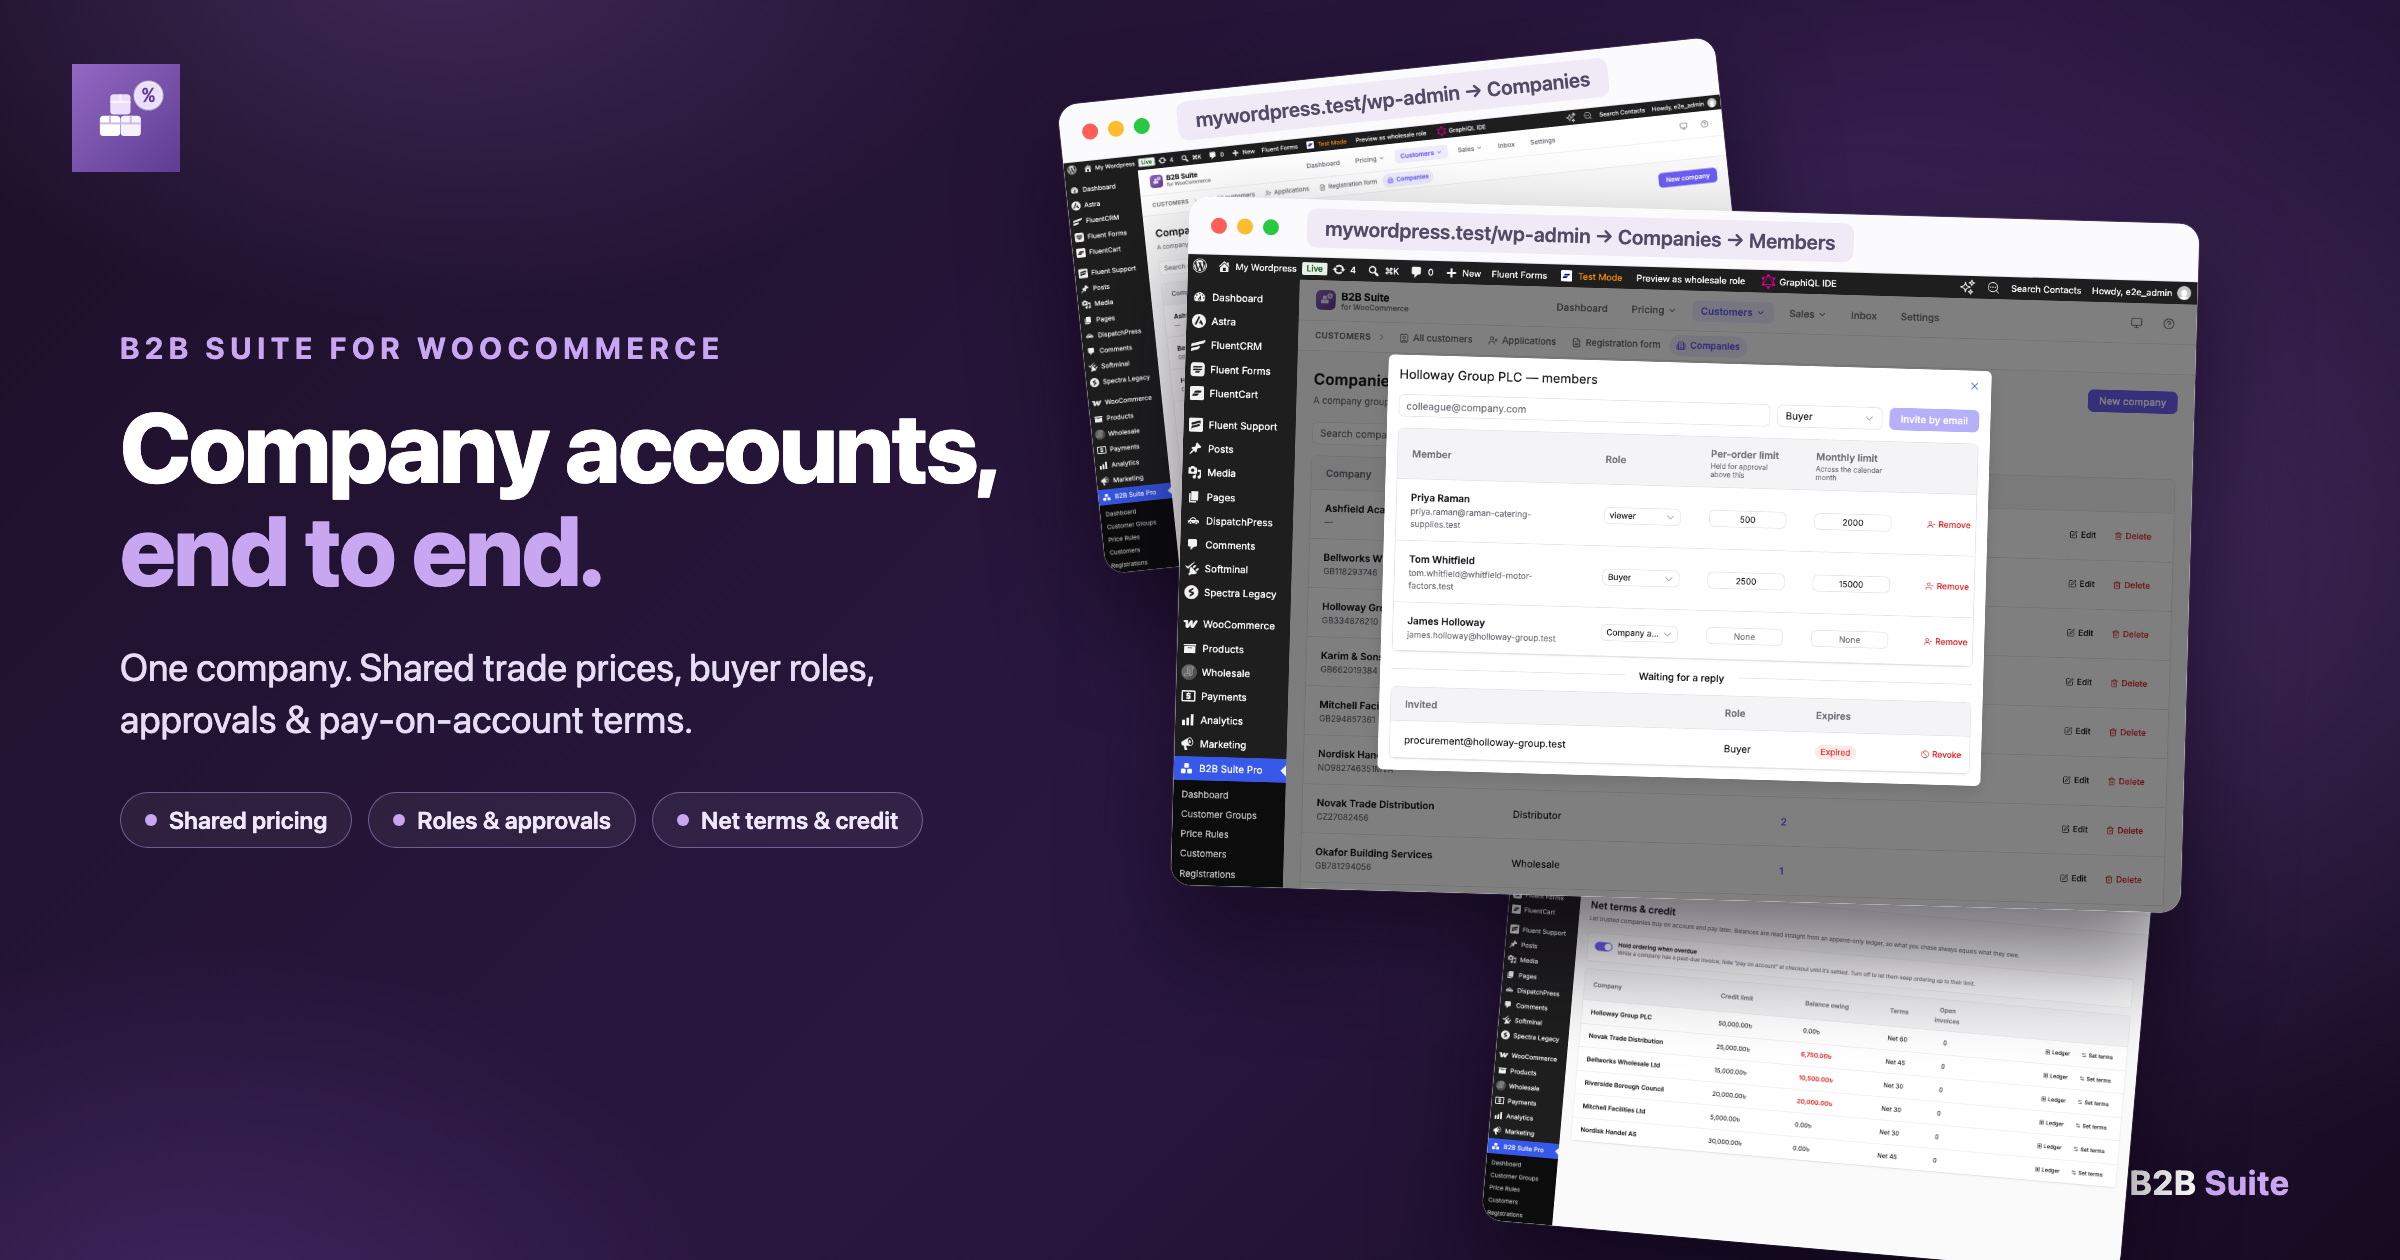
    Every step here runs on the free B2B Suite plugin. And if you’re hiding prices, you’re building a trade channel. When your buyers start needing more price tiers, company accounts, or pay-on-account terms, Pro picks up where the free plugin leaves off — same data, same pricing pipeline.

    Get B2B Suite free on WordPress.org and set up your login-to-see-prices store today. Need help? The docs cover every setting, and support is here if you get stuck.

  • How to Add AI Alt Text to WooCommerce Product Images

    How to Add AI Alt Text to WooCommerce Product Images

    Most WooCommerce stores have hundreds of product photos with no alt text. That hurts you twice. Shoppers who use a screen reader can’t tell what each photo shows, and Google can’t read the image either, so you miss free traffic from image search. ImageCraft fixes both, in bulk, straight from your dashboard.

    Why product alt text beats plain AI alt text

    Most AI tools only look at the image. They describe a hoodie photo as “a black hoodie on a white background.” That is correct, but it does not help you sell. It has no product name and none of the words a buyer would search. ImageCraft is different. Before it writes anything, it reads the product in WooCommerce and passes the details to the AI.

    ImageCraft sends the product name, SKU, categories, and price to the AI, and tells it to include the product name. So “a black hoodie on a white background” becomes “Teton black cotton pullover hoodie, Men’s Hoodies & Sweatshirts.”

    ImageCraft saves the alt text to the Media Library, on the image itself. So it shows up everywhere the image is used: the shop page, the product page, related products, and any block or theme that reads the image. You do the work once, and every spot that uses the image gets the benefit.

    Setup: two minutes

    📷 [SCREENSHOT: ImageCraft Settings → Integrations → WooCommerce, with “Include product information” checked and “Default Tone for Products” set to Product SEO]

    1. Install ImageCraft from the WordPress plugin directory and activate it. It detects WooCommerce on its own.
    2. Add your AI key. In ImageCraft → Settings → API, pick a provider (Anthropic Claude, OpenAI, or Google Gemini) and paste your key. On WordPress 7.0 and up you can use the built-in AI instead.
    3. Turn on product context. In ImageCraft → Settings → Integrations → WooCommerce, check Include product information. This is what makes the alt text product-specific, so don’t skip it.
    4. Pick a default tone on the same screen. Start with Product SEO (Recommended).

    Method 1: Do the whole catalog at once (recommended)

    This is the fastest way to fix a whole store. If you only try one thing, try this.

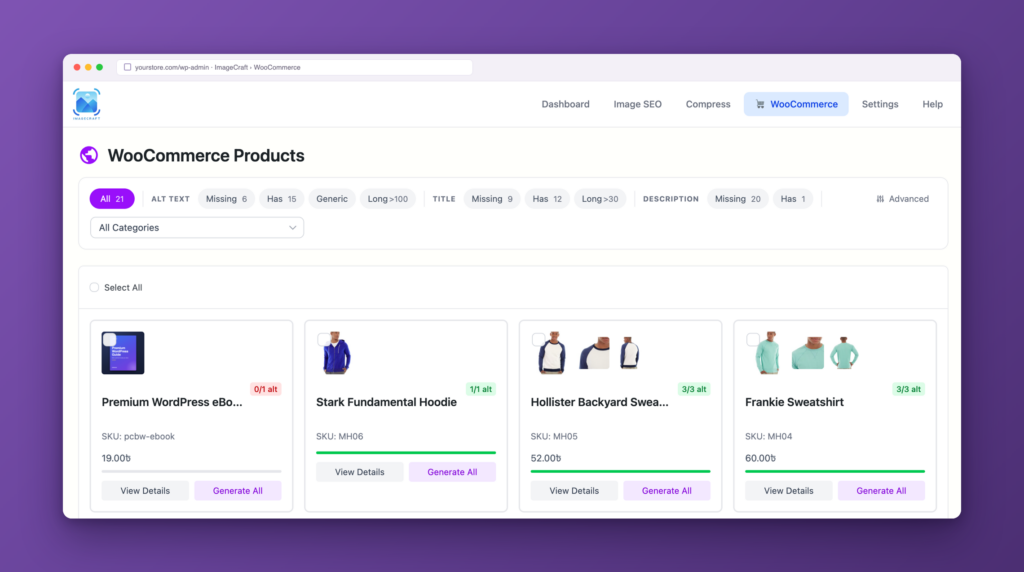
    1. Go to ImageCraft → WooCommerce. Your products show up as cards with a filter bar on top. Each card has an alt-text coverage badge, like 0/1 alt or 3/3 alt, so you can see at a glance which products still need work.
    2. Under Alt Text, click Missing to show only products with no alt text. You can also filter by Generic or Long >100, and do the same for Title and Description.
    3. Optional: narrow by category, or open Advanced to filter by date or price.
    4. Click Select All. If your filter spans more than one page, ImageCraft offers to select all of them, not just the ones you can see.
    5. Tick Alt text, Title, and Description in any mix. One AI call per image fills in whatever you ticked.
    6. Click Generate. ImageCraft gathers every image, featured and gallery, removes duplicates, and runs a background job. Close the tab if you like; it keeps running and resumes if interrupted.

    One job handles up to 500 images. For a big catalog, filter by category or price and run a few jobs in a row. Each new job starts where the last one ended.

    Method 2: One product at a time

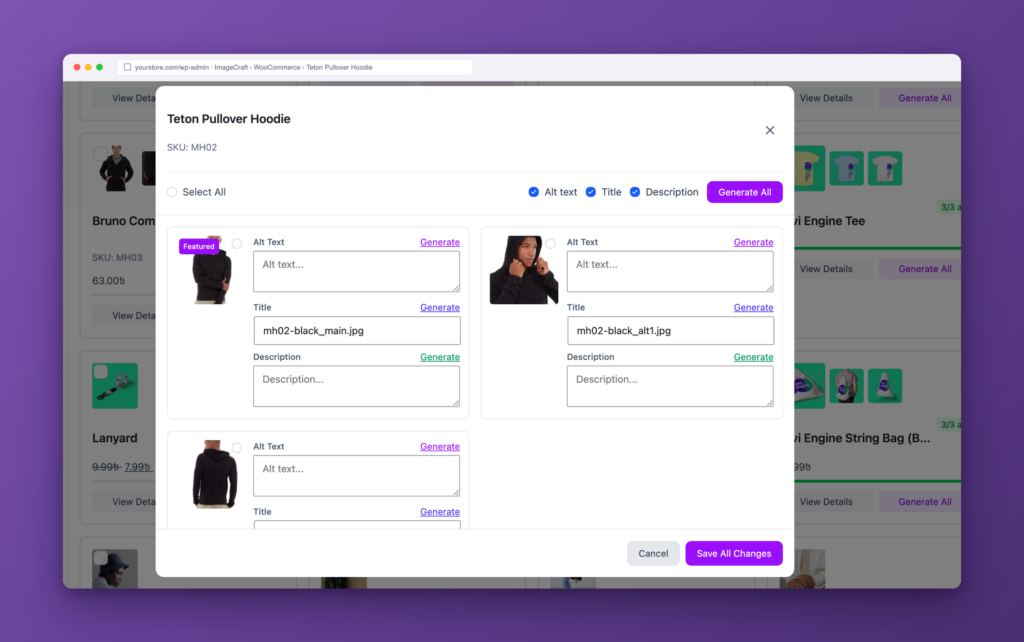
    Method 1 is great for volume. Sometimes you want a closer look. On any product card, click Generate All to write alt text for the featured image and every gallery image in one click. Or click View Details to open the product window. There you see the featured image (marked with a Featured badge) and every gallery image side by side, each with its own alt text, title, and description fields. Use the Generate link on any field to fill just that one, edit anything by hand, then click Save All Changes.

    Gallery images are the ones most often left blank. The featured image sometimes gets attention; the other gallery shots almost never do. Generate All covers the whole set at once.

    Method 3: Turn on auto-generate

    The two methods above clean up what you already have. This one keeps you clean going forward. Turn on auto-generate on upload in the settings, and every image you add to a product gets alt text as it uploads. New products go live ready for search, and you never build a backlog again. You can skip certain post types and skip images that already have alt text, so ImageCraft only fills the gaps.

    Pick the right product tone

    • Product SEO (recommended) — keyword-rich text for Google Images. Example: Teton black cotton pullover hoodie, Men’s Hoodies & Sweatshirts.
    • Product Descriptive — clear, plain text for screen readers. Example: Black pullover hoodie with a drawstring hood and front kangaroo pocket.
    • Product Lifestyle — for in-use or on-model photos. Example: Person wearing the black Teton pullover hoodie with the hood up.

    Not sure? Start with Product SEO. Set your default under Settings → Integrations → WooCommerce → Default Tone for Products. Want your own wording? Choose Custom Prompt. Even then, the product name, category, and SKU are still added as context, and your max-length limit still applies.

    Frequently asked questions

    Does it cover gallery images, or just the featured image?

    Both. Bulk Generate and per-card Generate All collect the featured image and every gallery image, with duplicates removed. Nothing gets missed.

    Will it overwrite alt text I wrote myself?

    Only if you want it to. Filter to Missing to touch empty images only, and turn on “skip images with existing alt text” to fill gaps without changing your work.

    Can it write titles and descriptions too?

    Yes. When you bulk-generate, tick Alt text, Title, and Description. One AI call per image handles the fields you pick, so there is no extra cost to adding them.

    Do I need ImageCraft Pro for this?

    No. The WooCommerce screen, product alt text, gallery generation, and the three tones are all in the free plugin. The free plan gives you 50 actions per day. Pro removes the daily limit and adds features like auto-compress on upload.

    Which AI provider should I use?

    Use your own key from Anthropic Claude, OpenAI, or Google Gemini. Any of them works well. You pay the provider directly, with no markup. If you are not sure, pick the one you already have an account with.

    Get started

    Install ImageCraft, add your AI key in Settings → API, turn on Include product information under Settings → Integrations → WooCommerce, then open the WooCommerce screen, filter to Missing, and click Generate. Your product images will be ready for search before your next coffee.

    Ready to make every product image count? Get ImageCraft →

  • Shrink Your Image Files Without Losing Quality — Right Inside WordPress

    Shrink Your Image Files Without Losing Quality — Right Inside WordPress

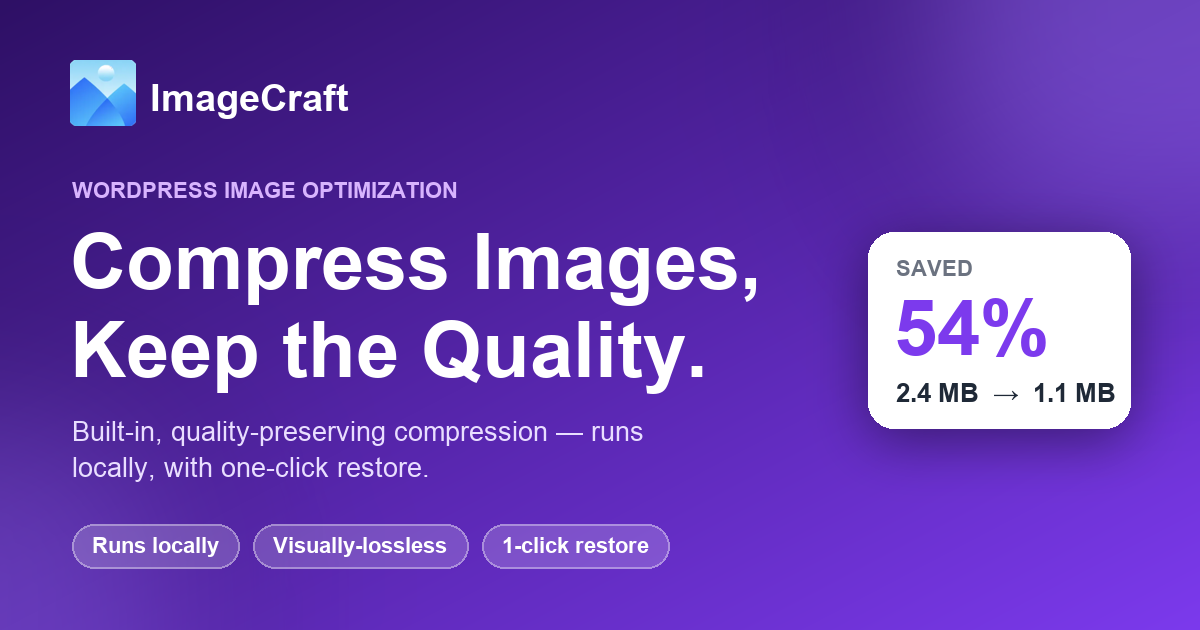
    Your pages can look perfect and still load slowly. Images are usually the heaviest thing on a web page — a single un-optimized photo can outweigh your entire layout, scripts, and fonts combined. That weight drags down your Core Web Vitals, your search rankings, and your visitors’ patience. ImageCraft fixes it at the source, right inside WordPress — locally, without quality loss, and with every original safely backed up.

    Why image size quietly hurts your site

    Most media libraries are full of images two to ten times larger than they need to be. Compressing them is one of the highest-impact, lowest-effort speed wins available — because page weight touches almost everything that matters:

    • Core Web Vitals. Your Largest Contentful Paint (LCP) is very often an image. Heavy images mean a poor LCP score.
    • SEO rankings. Faster pages are favored in search — and they keep visitors from bouncing.
    • Conversions. Every extra second of load time measurably reduces sign-ups, sales, and engagement.
    • Mobile experience. On phones and slower networks, a 4 MB photo is the difference between “instant” and “still loading.”

    Compress your library once with ImageCraft, and every page that uses those images gets lighter — with no rebuilds, no re-uploads, and no lost quality.

    How ImageCraft compression works

    ImageCraft takes a quality-first approach. Instead of aggressively crushing images to hit a number, it re-encodes them intelligently so the file gets smaller while the picture stays visually identical. Under the hood:

    • Runs locally on your server using Imagick, with an automatic GD fallback. No image ever leaves your site — no third-party API, nothing to sign up for.
    • Visually-lossless re-encoding. It strips bloated EXIF data and color profiles, enables progressive JPEG, and deliberately avoids chroma subsampling — so edges and text stay sharp.
    • Optional smart resize. Oversized images are scaled to a sensible maximum (2048px on the longest edge by default) — usually where the biggest savings come from.
    • Never-enlarge guard. It writes to a temporary file first and only keeps the result if it’s actually smaller. Already-optimized images are left untouched.

    Method 1: Compress a single image (or automatically on upload)

    The fastest way to optimize as you work — no leaving the screen you’re on.

    1. Open any image in the WordPress media modal and click the Compress button ImageCraft adds right there.
    2. Check the savings. ImageCraft shows the before/after size and the percentage saved — and backs up the original first.
    3. Want it hands-free? Enable auto-compress on upload (Pro) so every new image is optimized the moment it’s added.

    Method 2: Already have a full library? Compress in bulk

    If your site is already full of heavy images, you don’t need to touch them one by one. ImageCraft optimizes the underlying media library, so every page using those images gets lighter at once.

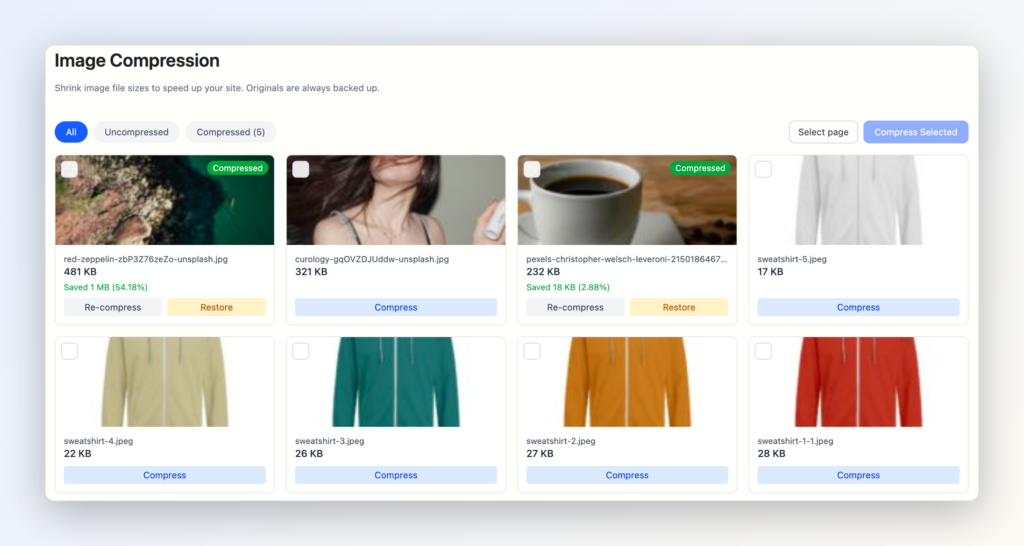
    1. Open ImageCraft → Compress and filter by Uncompressed to see everything that still needs work.
    2. Click Select page (or pick individual images) and choose Compress Selected.
    3. Watch the live progress — each image shows its new size and savings as it finishes.
    4. Changed your mind on any result? Click Restore to bring back the original instantly.

    For very large libraries, the bulk run processes hundreds of images in the background, so you can optimize an entire site in a single pass.

    Free vs Pro

    Free gives you everything you need to get real results: manual single and bulk compression, visually-lossless quality with a smart 2048px downscale, automatic backup and one-click restore, and 50 free actions per day (shared across AI features and compression). Pro removes the limits and adds automation: unlimited compression, adjustable quality and resize limits (or disable downscaling entirely), and automatic compression on upload.

    Frequently asked questions

    Will compression reduce my image quality?

    Not visibly. ImageCraft re-encodes images without chroma subsampling and strips only non-visual data (EXIF, color profiles), so the result looks identical while the file gets smaller. If a re-encode wouldn’t actually shrink the file, the original is kept untouched.

    Are my original images safe?

    Yes. Every original is backed up before it’s touched, and you can restore it — per image or in bulk — with a single click, at any time.

    Does ImageCraft send my images to a third-party service?

    No. Compression runs entirely on your own server using Imagick (or GD). Your images never leave your site, and there’s no external account or API to set up.

    Does it work with WooCommerce and page builders?

    Yes. Because ImageCraft optimizes the underlying media library attachment, anything that pulls from it — WooCommerce product images, Spectra, Kadence, Gutenberg blocks — automatically serves the lighter version.

    Get started

    ImageCraft is free to install and works alongside Gutenberg, Spectra, Kadence, WooCommerce, Yoast SEO, Rank Math, AIOSEO, SEOPress, and FileBird. Compress your library once, keep new uploads in check, and watch your page weight — and your Core Web Vitals — improve, without leaving your dashboard or risking a single original.

    Ready to lighten your library? Get ImageCraft →

  • Meet ImageCraft: AI Alt Text, File Renaming & Image SEO for WordPress

    Meet ImageCraft: AI Alt Text, File Renaming & Image SEO for WordPress

    Images make your WordPress site beautiful — but to search engines and screen readers, an image without alt text is invisible. Writing descriptive alt text for hundreds of images by hand is the kind of task everyone knows they should do and almost nobody finishes. ImageCraft fixes that with AI.

    What is ImageCraft?

    ImageCraft is a free, open-source WordPress plugin that generates accurate, human-quality alt text for your images using AI — then takes it further with SEO-friendly file renaming and a full image-SEO audit. It works with the new WordPress 7.0 native AI Client, or you can bring your own Anthropic Claude, OpenAI GPT-4o, or Google Gemini API key.

    The plugin itself is completely free. If you bring your own key, you only ever pay your AI provider directly — there’s no middleman.

    Why alt text matters

    Alt text does double duty. For accessibility, it’s how screen-reader users understand your visuals — and in many regions it’s a legal requirement. For SEO, it’s how Google understands your images, powering image-search traffic and reinforcing the relevance of the page they live on. Missing or generic alt text (“image1.jpg”, “DSC_0042”) quietly costs you both.

    What ImageCraft does

    AI alt text in 65+ languages

    Generate natural, descriptive alt text in English, Spanish, French, German, Japanese, Chinese, Arabic, Hindi, Tamil, Korean, and 55+ more — with 7 tone options (Professional, Casual, Technical, SEO, and three WooCommerce-specific tones), or your own custom prompt.

    Media library scanner & SEO audit

    Scan your entire media library with smart filters — date range, file size, alt-text quality, and missing or generic-alt detection. The SEO Audit Dashboard shows exactly how many images need attention and suggests fixes.

    Batch processing & auto-generate on upload

    Fix a backlog of hundreds of images in a single run with chunked processing and live progress tracking. Going forward, ImageCraft can auto-generate alt text in the background every time you upload — with an optional preview before it’s accepted.

    SEO file renaming

    Beyond alt text, ImageCraft can rename the underlying image files based on the generated description, so DSC_0042.jpg becomes something search engines can actually read.

    WooCommerce-aware

    For stores, ImageCraft generates alt text for product featured images and galleries using context-aware prompts that include the product name, category, and SKU — turning your catalog images into a search asset.

    Built to be safe and simple

    Your API keys are encrypted at rest with AES-256-CBC and stored in your own database. Nothing is sent to third parties except the AI provider you choose. A guided setup wizard gets you running in minutes: pick a provider, paste your key, and start generating — then track daily usage, acceptance rates, and estimated costs from the Usage Statistics panel.

    Get started

    ImageCraft is free to install and works alongside Yoast SEO, Rank Math, AIOSEO, SEOPress, WooCommerce, Gutenberg, Kadence, Spectra, and FileBird. Install it, run a media-library scan, and watch your accessibility and image-SEO scores climb — without writing a single line of alt text by hand.

    Ready to make every image count? Get ImageCraft →