Your trade sign-up form is the front door to your B2B channel. In 1.3.3 you can finally design it exactly the way you want — no code, and all free.
What’s new
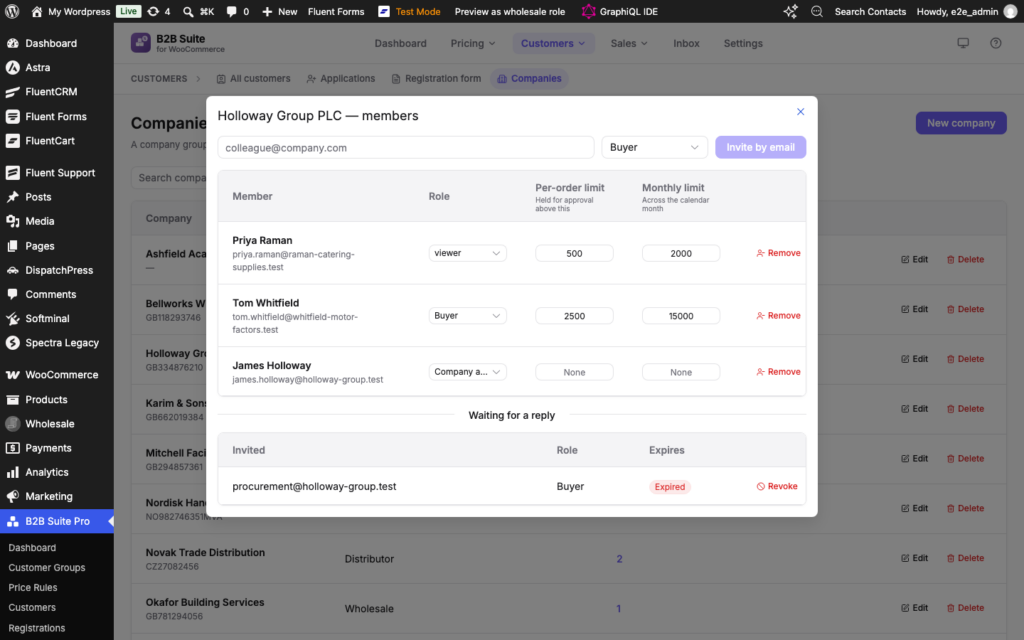
Drag-and-drop form builder. Design your B2B signup form visually: drag fields onto the canvas, arrange them in columns, set each field’s options and rules, and preview the real form. Build several forms, set a default, and drop one on any page with its shortcode or the new block.
A real registration block. A proper “B2B registration form” block for the editor — pick which form to show — plus a one-click preview that opens the live form in a new tab.
File uploads. Collect resale certificates and tax documents on the form. Files are stored privately (never as public media) and are downloadable only by your team from the approval screen.
Optional CAPTCHA. Google reCAPTCHA v2 or Cloudflare Turnstile — off by default. The built-in honeypot and minimum fill-time need no third-party service, so your privacy-first setup stays the default.
Improved & secured
The approval screen now shows uploaded files as secure download links and multi-choice answers clearly, with field labels drawn from your own forms.
GDPR personal-data export and erasure now cover custom registration fields and uploaded files.
A new Site Health check warns if uploaded files could be reachable directly on nginx or IIS servers — and shows the exact rule to add.
Refreshed the plugin’s brand logo and admin menu icon.
Keeping it polished: 1.3.4 and 1.3.5
Two maintenance releases followed. 1.3.4 cleaned up the admin Inbox reply composer and tidied internal code so the plugin passes automated checks cleanly. 1.3.5 consolidated the invoice settings into one “Invoices” screen, added drag-to-reorder for form rows, fixed message times that showed “0000-00-00” (existing threads are repaired automatically on update), and fixed a PHP 8.1 fatal on the rule screens. See the full changelog.
Update now
1.3.3 includes a small database update, applied automatically. Update from your Plugins screen, or get B2B Suite free on WordPress.org. The form builder is entirely free.
Marketplaces have been asking, and 1.3.2 answers: you can now run real B2B on a Dokan marketplace. A new free bridge add-on makes the whole suite vendor-aware, without reinventing anything Dokan already does well.
What’s new
Multivendor support for Dokan. Via the free Softminal B2B for Dokan add-on (requires Pro): vendor-scoped wholesale pricing, per-vendor invoices, marketplace trade registration, cross-vendor bulk ordering, and a “B2B Pricing” tab in each vendor’s dashboard.
A “Vendor” rule scope. When the Dokan add-on is active, Price Rules and Quantity Rules gain a Vendor scope, so you can price a whole vendor’s catalogue in one rule.
Email-deliverability Site Health check. Flags when no SMTP service is configured — so your invoices, approvals and quotes actually reach buyers instead of landing in spam.
Improved
PDF invoices now render non-Latin currency symbols (for example the Bengali Taka) correctly instead of a “?”.
The invoice PDF is now attached to the “order received” (processing) email by default, not only the completed-order email — useful for buyers paying on account.
The “which price wins” guide on the Price Rules screen is now a compact info tooltip, with dark-mode polish across the rule screens.
For developers
New hooks for vendor-aware pricing and rule scopes, plus a small database update (rule-ownership columns) applied automatically.
Update now
Update from your Plugins screen, or get B2B Suite free on WordPress.org. The Dokan bridge is a free download unlocked by your Pro licence (it needs B2B Suite Pro and Dokan active).
B2B is a relationship business. Trade buyers ask questions, negotiate, and come back. B2B Suite 1.3.0 gives that conversation a proper home — and the basics are free, where most competitors paywall buyer messaging.
What’s new
Buyer messaging (free). Customers message you from their account, and you answer from a new Inbox in the admin. Basic buyer↔merchant messaging costs nothing.
One Inbox for everything. General questions and quote negotiations now live in the same place, each thread flagged when it needs your reply — so nothing falls between a “support” tool and a “quotes” tool.
Convert a conversation into a quote (Pro). One click turns a buyer’s question into a draft quote, carrying the whole chat across with it.
Pages settings tab. Copy every storefront shortcode — [smb2b_registration], [smb2b_bulk_order], [smb2b_messages], [smb2b_quotes] — from one place.
Theme-matched storefront colour. The storefront accent now matches your theme automatically (Settings → Bulk order form), or set your own.
Improved & fixed
The bulk order form uses numbered pagination.
The messages Inbox loads more conversations as you scroll, and you can delete a thread.
Quote requests waiting on you show a “New” badge; draft, declined and expired quotes can be deleted.
Storefront and admin polish: message-centre button visibility, the quote centre for shop managers, the import results table, and dark-mode readability.
Shortly after: 1.3.1
The follow-up 1.3.1 maintenance release added an Applications search box, made auto-approve registrations actually work, and fixed edit flows that were dropping company member spending limits and saved billing details. See the full changelog.
Update now
1.3.0 includes a small database update, applied automatically. Update from your Plugins screen, or get B2B Suite free on WordPress.org. Convert-to-quote is part of Pro.
B2B pricing is only as good as your confidence that it’s correct. B2B Suite 1.2.0 is built around that — a new way to see your shop through a buyer’s eyes — plus quality-of-life upgrades for teams.
What’s new
View shop as… Preview your storefront as any customer, a whole customer group, or a logged-out guest — straight from the admin bar. The preview follows you from page to page and shows exactly their prices, catalogue and payment options. The fastest way to prove a rule does what you think it does.
Shared purchase lists (Pro). Share a saved list with your company so colleagues can load and reorder it. Only the owner can edit it, so your standard order stays consistent across the team.
Quantity-discount progress bar (Pro). An “Add N more to pay X each” nudge on product pages, based on what’s already in the cart — a gentle push toward the next price break.
Ex/Inc VAT toggle off switch. You can now turn the price-switch off entirely under Settings → General.
Improved & fixed
Quote history is now paginated.
Bulk ordering grids and discount tables follow your tax-display setting, so prices always match the product price shown beside them.
Privately hidden variations no longer appear in the bulk ordering grid.
Clearer reasons when a grid line can’t be added because of quantity limits.
Update now
1.2.0 includes a small database update that’s applied automatically on activation. Update from your Plugins screen, or get B2B Suite free on WordPress.org. Shared lists and the progress bar are part of Pro.
Our first feature update after launch is all about ordering at speed and staying in control. B2B Suite 1.1.0 brings a spreadsheet-style order grid for your buyers and an approvals screen for you.
What’s new
Bulk Ordering Grid (Pro). A simple table for ordering many sizes and colours at once. Buyers can copy-paste straight from Excel and add the whole grid to the cart in one click — ideal for apparel, parts and anything with variations.
Variation price breaks. Quantity-discount tables now update automatically as a customer switches between options, so the price they see always matches the variation they’ve picked.
Order Approvals. Review, approve or reject orders that were held by a company’s spending limit — right from your dashboard, without digging through order notes.
Quote notifications. Email alerts now go out automatically when a new quote message arrives, and pending quotes are clearly flagged so nothing waits on you unseen.
Also fixed
The pending-quotes counter that always showed zero now reports the real number.
Who it’s for
If your buyers order in volume across many variations, the grid turns a tedious one-at-a-time flow into a single paste-and-go. And if you run company accounts with spending limits, Order Approvals gives you a clean place to sign off the orders that need a human.
Update now
1.1.0 is a safe drop-in update with no data changes. Update from your Plugins screen, or get B2B Suite free on WordPress.org. The Bulk Ordering Grid is part of Pro.
This is where it starts. B2B Suite for WooCommerce 1.0.0 is the first public release — one plugin that turns a standard WooCommerce shop into a real B2B and wholesale store, with no stack of add-ons to stitch together.
The idea behind it is simple: every price a buyer sees should be decided one way, everywhere. So B2B Suite runs on a single pricing pipeline — the shop, the product page, the cart and the block checkout all agree, and a retail shopper can never be shown a wholesale price by accident.
What’s in 1.0.0
Customer-group pricing — put buyers into groups (Wholesale, Distributor, VIP) and set percentage, amount-off or fixed prices per group, product, category, tag or quantity band.
Hidden prices — hide prices and the add-to-cart button from guests, or until a trade account is approved.
Trade registration & approval — a registration form with your own business fields, an approval queue and email notifications. Add it with the [smb2b_registration] shortcode.
Quantity rules — minimum order quantity (MOQ), maximum and pack (step) sizes, enforced at the shop, cart and checkout.
Bulk order form — a fast order pad for buyers, plus quick order by SKU.
Buy X, get Y — reward bulk orders with free or discounted units.
Reorder — one-click “order again” from a past order.
PO numbers and an ex/inc VAT price toggle at checkout.
Built to last
Everything here is HPOS-ready and works with the WooCommerce Cart & Checkout Blocks from day one — because B2B features that only work on the classic checkout aren’t really done. All B2B data lives in the plugin’s own tables, not scattered across postmeta.
Get started
Download B2B Suite free on WordPress.org, activate it over your existing WooCommerce store, and the setup wizard will walk you through your first customer group, pricing rule and registration page. The docs cover every setting.
Most B2B stores treat the buyer as the customer: Jane has an account, Jane gets the trade price, Jane places the orders. But Jane is rarely the whole story. The actual customer is Holloway Trade — and Jane is one of four people there who buy from you. A new purchasing assistant joins and needs the same prices. A director wants to approve anything over a few thousand. The finance team expects to pay on 30-day terms, not by card.
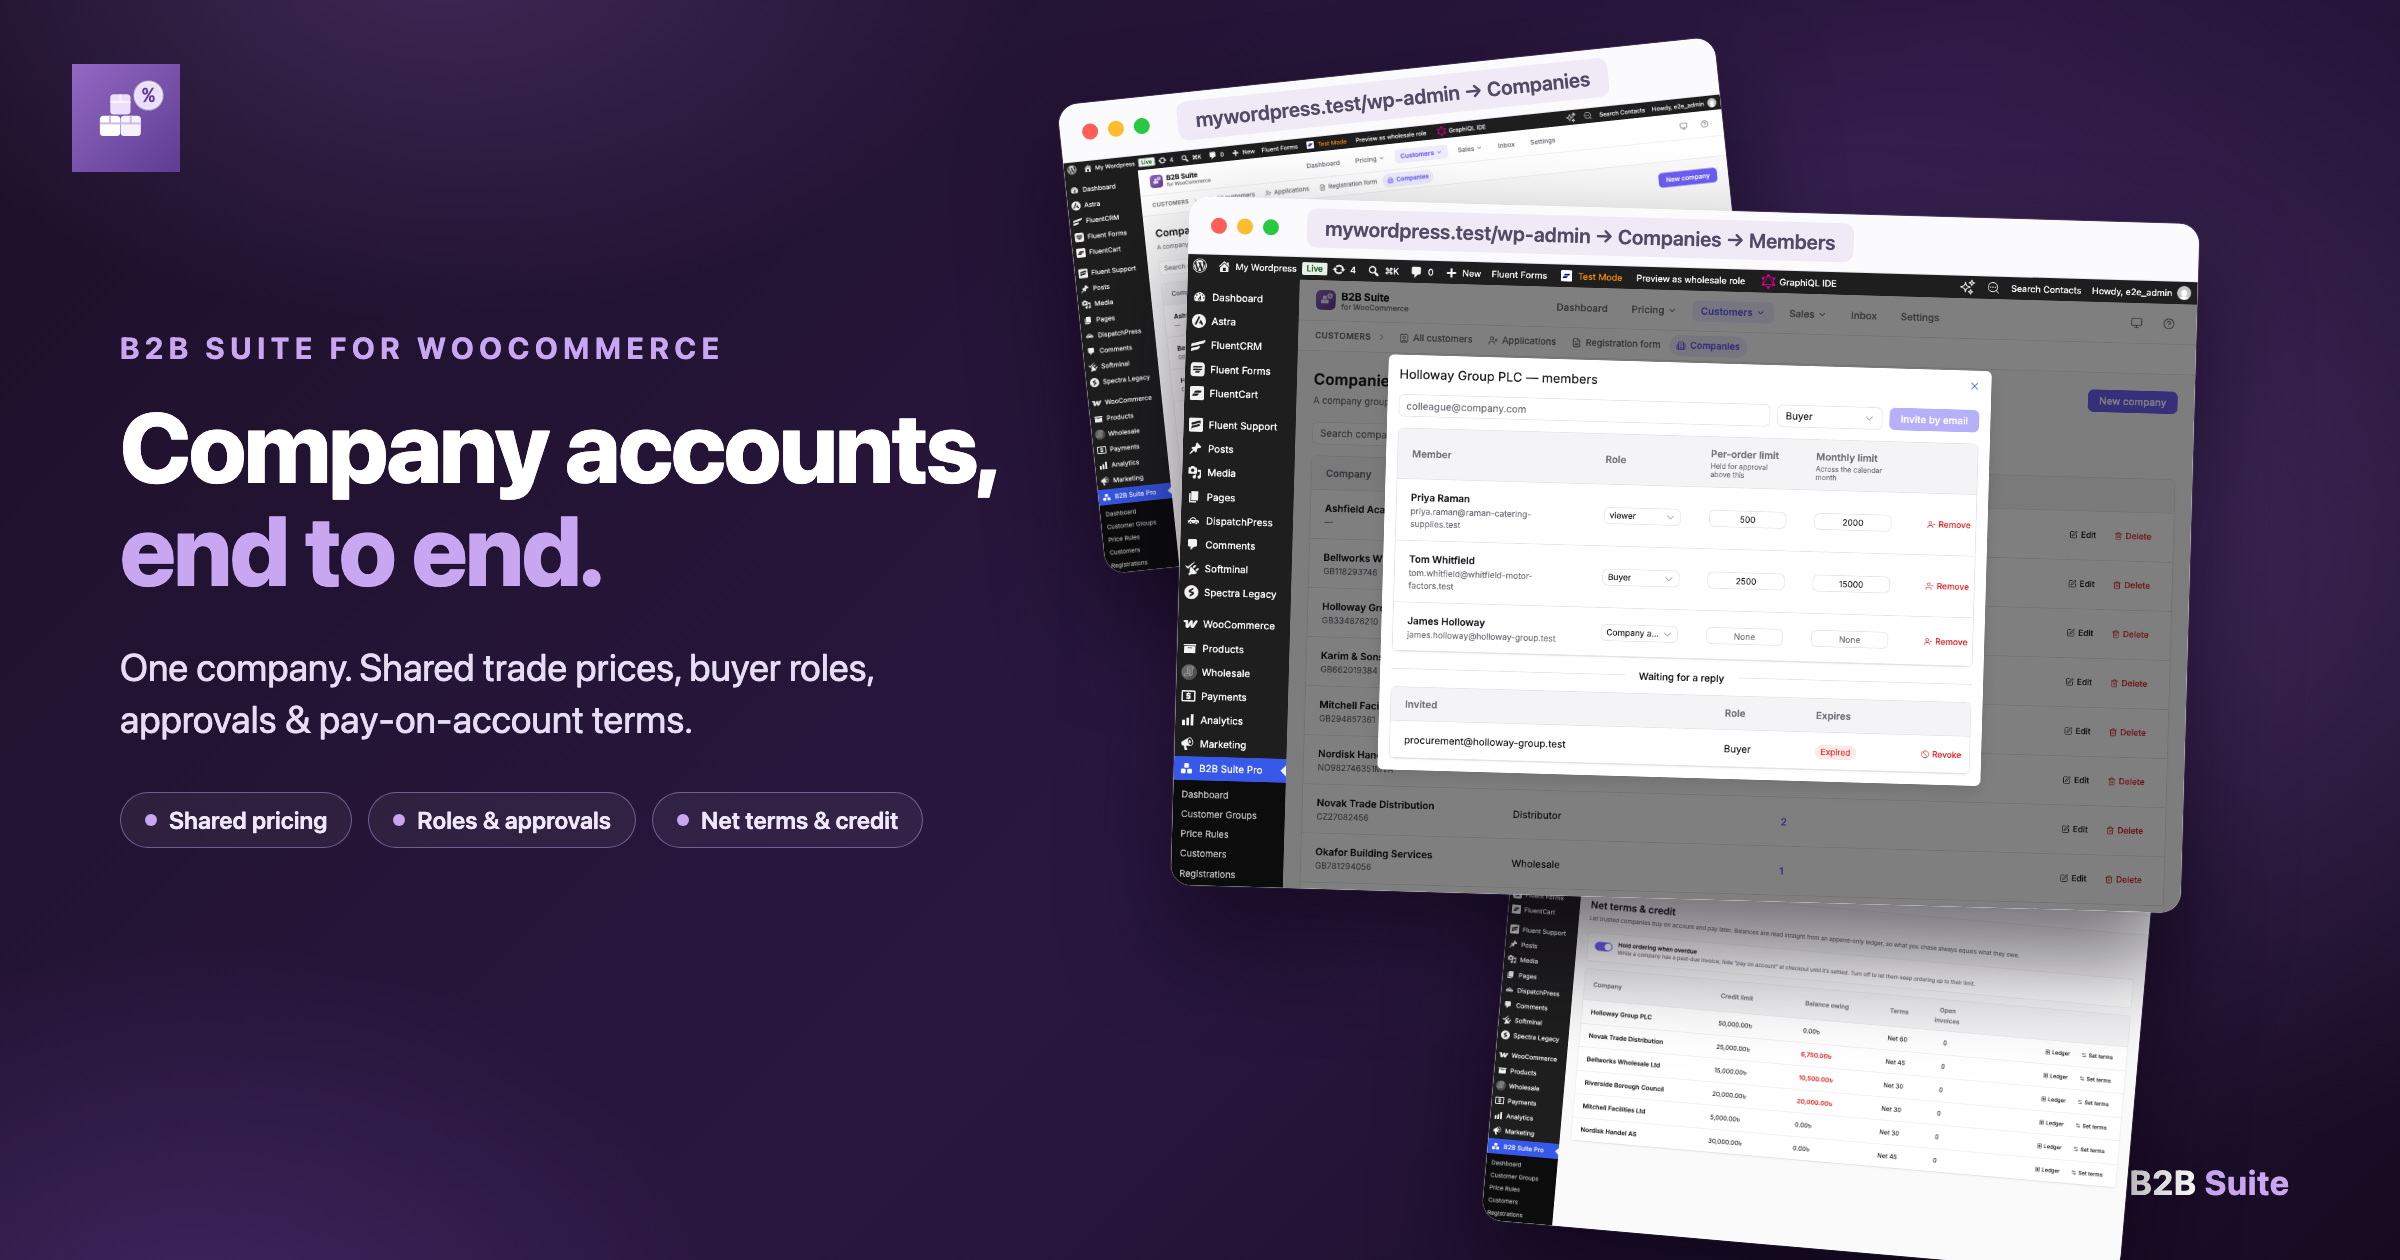
That’s the gap company accounts fill in B2B Suite for WooCommerce (Pro). One company record owns several buyers; every member sees the company’s trade prices, orders and credit; and the store can enforce roles and limits that match how a real purchasing team works — instead of pretending each login is a separate customer.
This post walks the whole flow end to end: create the company, give it a pricing group, invite its people, cap their spending, put the company on terms — and then what it looks like from the buyer’s side, order after order.
TL;DR
A company account groups several WordPress users under one buying organisation. The company has a name, a VAT number and a pricing group; the people are its members.
The company’s group overrides each member’s own — so every colleague pays the same agreed trade price, whether they were individually assigned a group or not.
You invite members by email with a role: Admin (manages the company), Approver (approves orders), or Buyer (places orders). Invites are single-use and expiring.
Set a per-buyer spend limit per order and per month. An order above the limit is held for approval instead of going through — the approver gets a notification and decides on a signed link.
Give the company net terms and credit (Net 30/60/90). The buyer picks “pay on account” at checkout, and you track exposure against a real ledger with statements and overdue reminders.
Members share the company’s purchase lists and message threads, so a team orders from one shared context instead of four personal ones.
Company accounts are a Pro feature: they need the free B2B Suite plugin (which owns the schema and pricing pipeline) plus the Pro add-on.
Why a company account?
A wholesale-pricing plugin gives you groups and discounts — but it still sees one login, one customer. Real trade buyers don’t work that way, and the friction shows up in familiar places:
Prices drift between people. Jane was assigned the trade group when she applied; her colleague Sam joined later and nobody assigned him, so Sam sees retail and emails you about it.
Orders scatter across accounts. Jane, Sam and Priya each place orders under their own logins, so you can’t see Holloway Trade’s history in one place — and neither can they.
No one can say no. Any buyer can place any order, because the store has no idea who’s allowed to commit the company’s money.
“Pay by card” doesn’t fit. A business that buys on invoice simply won’t check out with terms it doesn’t have.
A company account fixes all four at once, because it moves the customer from person to organisation:
The company is the customer. The people are how it buys.
Step 1: Create the company and set its pricing group
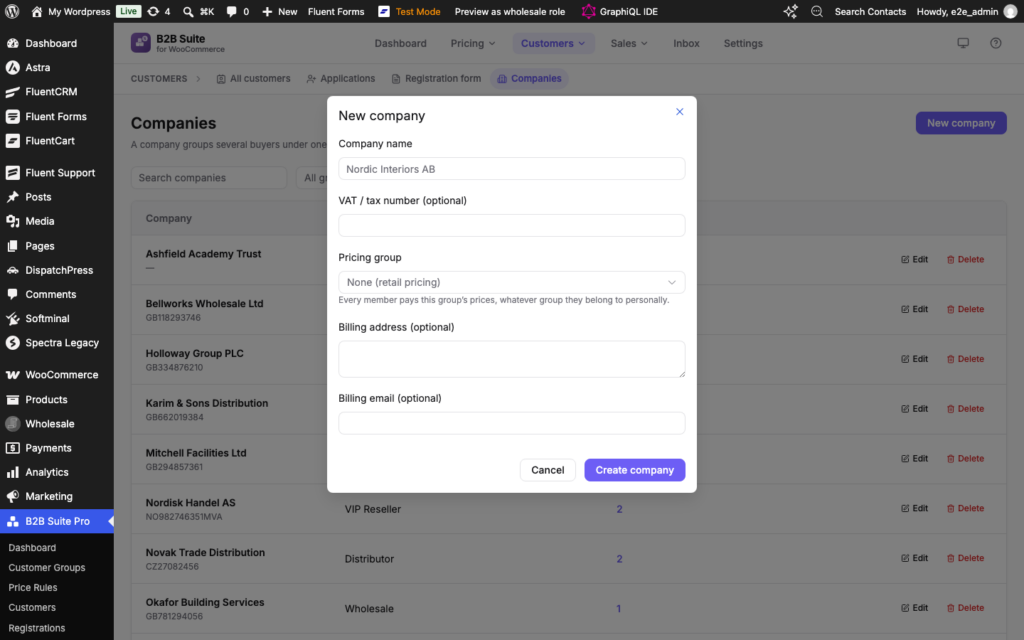
In B2B Suite → Customers → Companies (Pro), create a new company. You give it a name, an optional VAT or tax number, and — the part that does the real work — a pricing group.
The pricing group is the same customer group you already use for wholesale pricing: the one that carries your percentage-off, fixed-price and quantity rules. What’s different is who it applies to:
Every member of this company pays this group’s prices, whatever group they belong to personally.
That one rule is what stops the Jane-and-Sam drift. Assign Holloway Trade to your “Wholesale — Distributor” group, invite three people, and all three see exactly the same prices from the moment they accept. When you renegotiate, you change the company’s group once — not three accounts.
You can also store the company’s billing details here, which then appear on its orders and invoices.
Step 2: Invite the people — Admin, Approver, Buyer
Next, add the people. Instead of handing out a shared login (which breaks audit trails and gets shared anyway), you invite each colleague by email with one of three roles:
Admin — manages the company: invites and removes members, and changes settings.
Approver — approves orders that trip a spend limit. An Admin can approve too, but a company often wants a finance lead doing it.
Buyer — places orders. This is the everyday role for most of the team.
Each invite is single-use and expires, and it’s tied to the email address — so only the right person can accept it. When a colleague accepts, their account is linked to the company and they see the company’s trade prices immediately — no waiting for you to set them up.
What you don’t have to do is remember to assign each new starter a group. Their group comes from the company, so onboarding a new buyer is one invite, not a pricing-setup chore. And if someone leaves, removing them from the company sends their pricing back to their personal account — nothing lingers.
Step 3: Cap the spend with limits and an approval chain
A company that trusts its buyers still wants guardrails. B2B Suite lets you set two limits per member: a per-order limit and a monthly limit.
When a buyer tries to place an order that exceeds their limit, the order doesn’t just fail — it’s held for approval:
The order is placed into an “awaiting approval” state, and the items’ stock is reserved so they can’t be sold to someone else while the order waits.
The company’s Approver is notified. They can open the order from a signed link — no shared logins, no “log in as Jane”.
The approver approves or rejects. Approve, and the order proceeds (completing on account if the company has credit — more below, or by the normal payment link otherwise). Reject, and the buyer hears about it with the stock released.
This is the part that lets a junior buyer build a basket without giving them the keys to the company cheque book. Shopify B2B treats this as a flagship feature; on WooCommerce, it’s what turns a store into somewhere a real purchasing team can work.
Step 4: Put the company on terms and credit
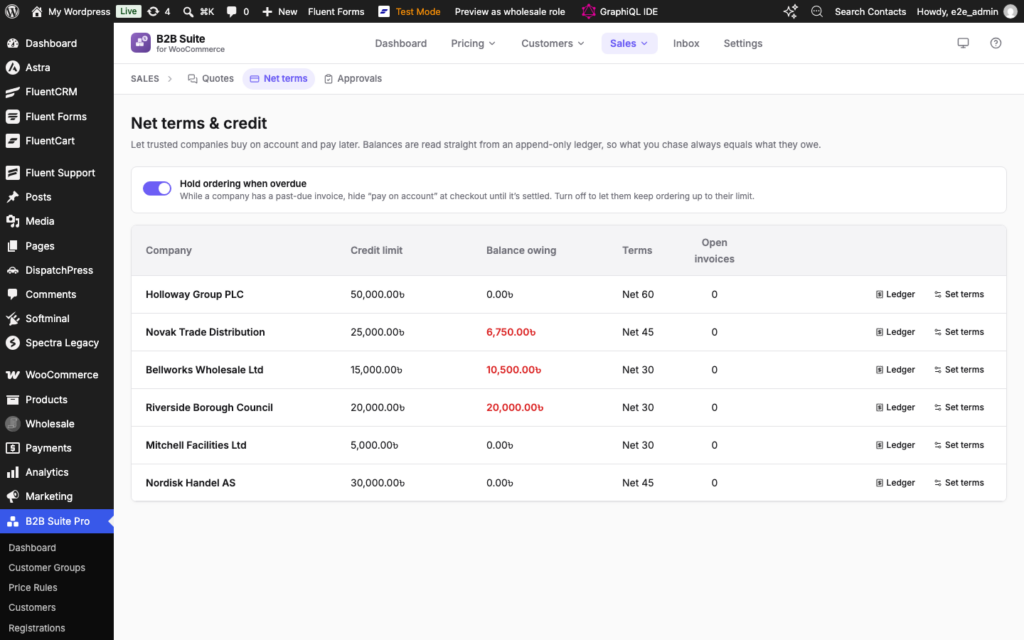
Trade buyers expect to pay on invoice. On the company record you can set up a credit account: a credit limit and terms — Net 30, 60 or 90.
From then on, checkout offers the company’s buyers “pay on account” as a payment method, up to their available credit. Behind the scenes B2B Suite keeps an append-only ledger: every order debits it, every payment and refund credits it, and the store checks limit − outstanding balance at checkout, so a company can’t quietly exceed its exposure. Over the limit, the order is declined with a clear message.
When invoices come due, you don’t need to chase manually: B2B Suite sends the company a statement each month and overdue reminders on a schedule you set, all rendered from the same ledger. You see, per company, exactly what’s outstanding and what’s overdue — in the admin, not in a spreadsheet.
What a company buyer sees every day
Once the company is set up, the everyday experience is deliberately quiet — everything just works:
Prices. A member browses the shop and sees the company group’s price, resolved through the same single pricing pipeline every B2B price runs through. If they (or you) ever wonder why a number is what it is, the price explainer shows the full decision — including the line that says a price list for their company won. Because one resolver answers the product page, the cart and the checkout, the price can’t change mid-purchase.
Their own account, the company’s context. Each person logs in as themselves — order history is still per-person where it should be — but shared company features (below) treat them as one organisation.
Consistent behaviour everywhere. Company pricing applies on the shop, in the bulk order form, and in the block checkout, because it’s resolved at the pricing layer, not patched per page.
Working together: shared lists and company threads
The last piece is what makes a team feel like one account rather than four people with a shared discount.
Shared purchase lists. Buyers in B2B Suite can save reorder lists — “Monthly restock”, “Site consumables”. With a company account, a member can share a list with the company. Every colleague then sees it (badged with who shared it) and can load it and order from it; only the owner edits it. The person who manages the supplier relationships builds the list once, and the whole team orders from it.
Company conversations. If a buyer messages you about an order, or you’re negotiating a quote, the thread is visible to the whole company — not trapped in one person’s inbox. A colleague can follow up or answer while the original buyer is on leave, and the conversation history travels with the company rather than with the individual. Quotes raised in those threads stay tied to the same company context.
The result: the company builds one shared working relationship with your store — one set of prices, one shared list of what it reorders, one thread of decisions — while each person still logs in with their own account and their own permissions.
FAQ
Do company accounts work with the free B2B Suite plugin?
Company accounts are a Pro feature. You need the free B2B Suite plugin for WooCommerce installed and active (it owns the database schema and the pricing pipeline), plus the Pro add-on. Everything else in the free plugin — groups, price rules, registration, bulk ordering — keeps working exactly as before.
Does the company’s group really override a member’s personal group?
Yes. Pricing is resolved member → company → group, and the company’s group wins. If a buyer belongs to a personal group too, the company’s pricing takes precedence while they’re a member — which is what keeps every colleague on the same agreed price. Remove them from the company and their personal pricing applies again.
What happens when an order exceeds a buyer’s spend limit?
The order is held for approval rather than blocked: stock is reserved, the company’s approver is notified, and they approve or reject from a signed link. Approve and the order proceeds; reject and the stock is released and the buyer is told.
Can buyers pay on invoice?
If the company has a credit account, yes — “pay on account” appears at checkout up to the available balance, and the order is tracked in a real ledger with statements and overdue reminders. Net 30, 60 and 90 are supported.
Does every member see the same order history?
Each person has their own account and their own order history, but company-shared context — purchase lists and conversations — is visible to every member, so the team works from one shared picture without sharing logins.
How do new starters get trade pricing?
You invite them by email with a role. When they accept, they’re a company member and see the company’s trade prices immediately — no separate group assignment needed.
Conclusion
A B2B store that treats each login as a separate customer ends up with drifted prices, scattered order history and no way to say no. Company accounts fix that by making the organisation the customer: one pricing group for the whole team, colleagues invited with real roles, spend limits with an approval chain, and pay-on-account terms tracked in a proper ledger.
Set up is four steps — create the company, pick its group, invite its people, set the limits and terms — and from then on the storefront quietly behaves like one account, because it is one.
B2BKing is one of the most complete B2B plugins for WooCommerce — groups, rules, companies, credit, quotes. That completeness is exactly why switching feels risky: there’s a lot of data, and nobody wants to rebuild a season’s worth of pricing and accounts by hand.
Good news: you don’t have to. B2B Suite has an importer built specifically to bring a B2BKing store across — groups, buyers, every kind of price rule, quantity rules, tax exemptions, catalogue visibility, companies, credit balances and offers — and it does it as a dry run first, never writing to B2BKing’s own data, and safe to run twice.
This guide walks the whole move, step by step, using the importer in the free B2B Suite plugin. You can migrate and check your pricing before spending anything.
TL;DR
The importer is in the free plugin: B2B Suite → Settings → Import. Pick B2BKing as the source.
It reads B2BKing straight from WordPress storage — its group/rule/offer post types, user meta and post meta — so B2BKing doesn’t need to be active and nothing is ever written back to it.
Groups, buyers, approval, all three rule types (percentage / fixed amount / fixed price), per-group product prices and quantity tiers, min/max/multiple quantity rules, tax exemptions, catalogue visibility, payment gating, companies & sub-accounts, credit limits & balances, and active offers all come across automatically.
Per-user product prices, shipping-method gating, max-spend caps, custom registration fields and RFQ chat history need a manual step — each is called out by name in the report.
Every import is a dry run first; nothing is written until you confirm. Running it again updates instead of duplicating.
The free plugin includes one customer group. B2BKing stores usually have several, so run the import with Pro active to bring every group across — and Pro-domain data (companies, credit, quotes, tax) imports now and switches on when you upgrade.
What the importer actually does
B2BKing keeps its groups and rules as custom post types, a user’s group on user meta, and its per-product prices on product meta. The importer reads all of it directly from those WordPress tables — which is what makes the move safe:
It reads, it doesn’t rewrite. The importer only writes into B2B Suite’s own groups, rules and tables. B2BKing’s data is never touched.
B2BKing doesn’t need to be active. Because everything lives in WordPress storage, the import works whether the B2BKing plugin is switched on or off.
Every run is a preview by default. You see the groups, customers, rules, companies, credit accounts and quotes it would create, plus a warning for every record it can’t map cleanly. Nothing is written until you confirm.
Running it twice is safe. The importer records a map of “this B2BKing record became this B2B Suite record,” so a second run updates those records instead of duplicating them — import early, keep selling on B2BKing, re-import at switchover.
What comes across automatically
B2BKing is the incumbent B2B Suite maps most completely. In one pass:
Customer groups → customer groups. Each B2BKing group becomes a B2B Suite customer group.
Buyers, their group and approval state. Every user is placed into the right group, approved or pending as they were.
Price rules — all three types. Percentage off, fixed amount off and fixed price, across B2BKing’s who (group / everyone) and what (all products / product / category) dimensions.
Per-group product prices & quantity tiers. The prices B2BKing stores on the product itself — including tiered “buy more, pay less” breaks — come across as product rules.
Quantity rules. Minimum, maximum and multiple (pack-size) rules, including product-level min/max/step.
Group tax exemption → tax-exempt groups.
Catalogue visibility. Hide-prices-from-guests, a fully private “B2B mode” catalogue, and per-group hidden categories.
Payment method gating → method gating. Which payment methods a group is allowed.
Companies & sub-accounts. A parent account becomes the company admin; its sub-accounts become company buyers.
Company credit. Credit limits and consumed balances become a credit account with an opening ledger entry.
Active offers → quotes. A live B2BKing offer to a customer imports as a quote they can still accept.
What needs a manual step (and why)
A short list can’t be mapped automatically — usually because the two plugins model something differently and a blind copy would be wrong. The importer flags each one in the dry-run report:
Per-user product prices. B2BKing can price a single product for a single user; B2B Suite’s customer pricing is store-wide (a customer sees their price on everything). Rather than guess, single-user product prices are flagged.
Shipping-method gating. B2B Suite gates shipping too, but WooCommerce shipping method ids differ between installs, so the importer asks you to set the shipping allow-lists by hand rather than map ids it can’t be sure of.
Maximum order value caps. B2B Suite caps order quantity, not spend, so a max-spend limit is flagged.
Standalone credit users. A user with a credit limit but no company has nowhere to attach in B2B Suite’s per-company credit model — flagged so you can create the company first.
Custom registration fields. Recreate any extra fields you added to the B2BKing sign-up form.
RFQ conversation history. The active offer imports as a quote; the back-and-forth chat behind it doesn’t (low value once the offer itself is across).
Everything here is surfaced as a named warning with a note on how to finish it — that list is your manual to-do list.
Where each B2BKing thing lands
If you think in B2BKing terms, here’s the quick translation. Items marked Pro are Pro features — but the importer still writes them on the free plugin now, and they switch on when you upgrade.
In B2BKing
In B2B Suite
How
Customer groups
Customer groups
Automatic
Rules (%, fixed amount, fixed price)
Price rules
Automatic
Per-group product prices & tiers
Price rules
Automatic
Min / max / multiple quantity rules
Quantity rules
Automatic
Group tax exemption
Tax-exempt groups
Automatic · Pro
Hidden prices / B2B-mode / hidden categories
Catalogue visibility
Automatic · Pro
Payment method restrictions
Method gating
Automatic · Pro
Companies & sub-accounts
Company accounts & users
Automatic · Pro
Credit limits & balances
Net terms & credit
Automatic · Pro
Offers
Quotes
Automatic · Pro
Per-user product prices
Customer pricing
Manual
Shipping-method restrictions
Method gating (shipping)
Manual
One heads-up: full B2B mode
If your B2BKing store runs in full B2B mode — the whole catalogue hidden from anyone who isn’t a logged-in, approved trade customer — the importer will faithfully carry that across and make your B2B Suite catalogue private too.
That’s correct, but it’s dramatic, so the dry run calls it out as a heads-up notice (separate from the “couldn’t migrate” warnings) before you commit. If you’d rather open the catalogue up after switching, you can change it under Settings → Access & visibility once the import is done.
Migrate step by step
Seven steps, and steps 4–6 are the whole of it.
Step 1: Install B2B Suite (free)
Add B2B Suite for WooCommerce from WordPress.org alongside your existing setup. It won’t fight B2BKing yet — you’re only reading data.
Step 2: Activate Pro (most B2BKing stores will want it)
The free plugin ships with a single customer group, and much of what makes B2BKing worth migrating — companies, credit, quotes, tax exemptions, catalogue visibility — is Pro-domain. Run the import with Pro active so all of it comes across in one pass. The dry run tells you what it found either way, so you can decide before paying.
Step 3: Open Settings → Import and choose B2BKing
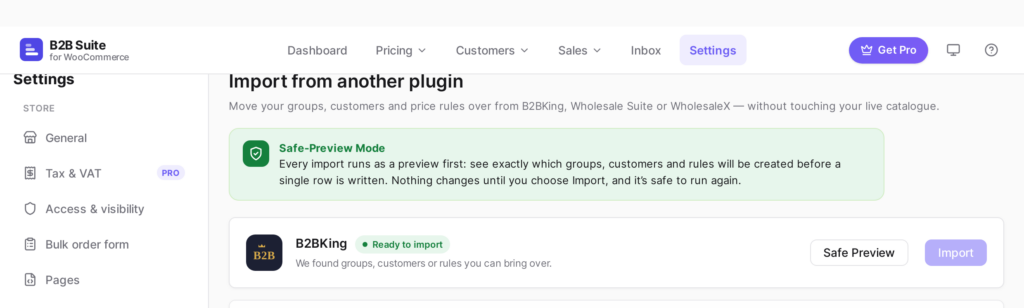
Go to B2B Suite → Settings → Import. The importer detects B2BKing’s stored data automatically. Choose it as the source.
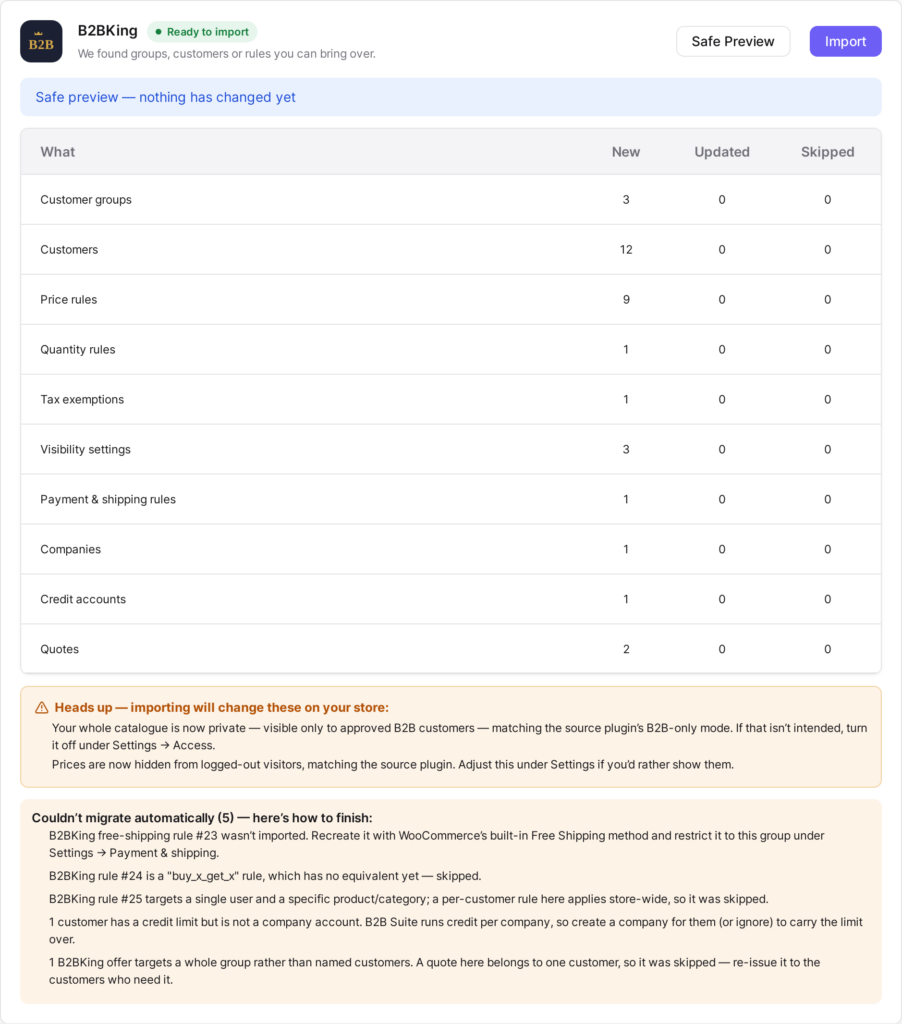
Settings → Import: B2B Suite detects B2BKing and marks it “Ready to import.”
Step 4: Run the dry run
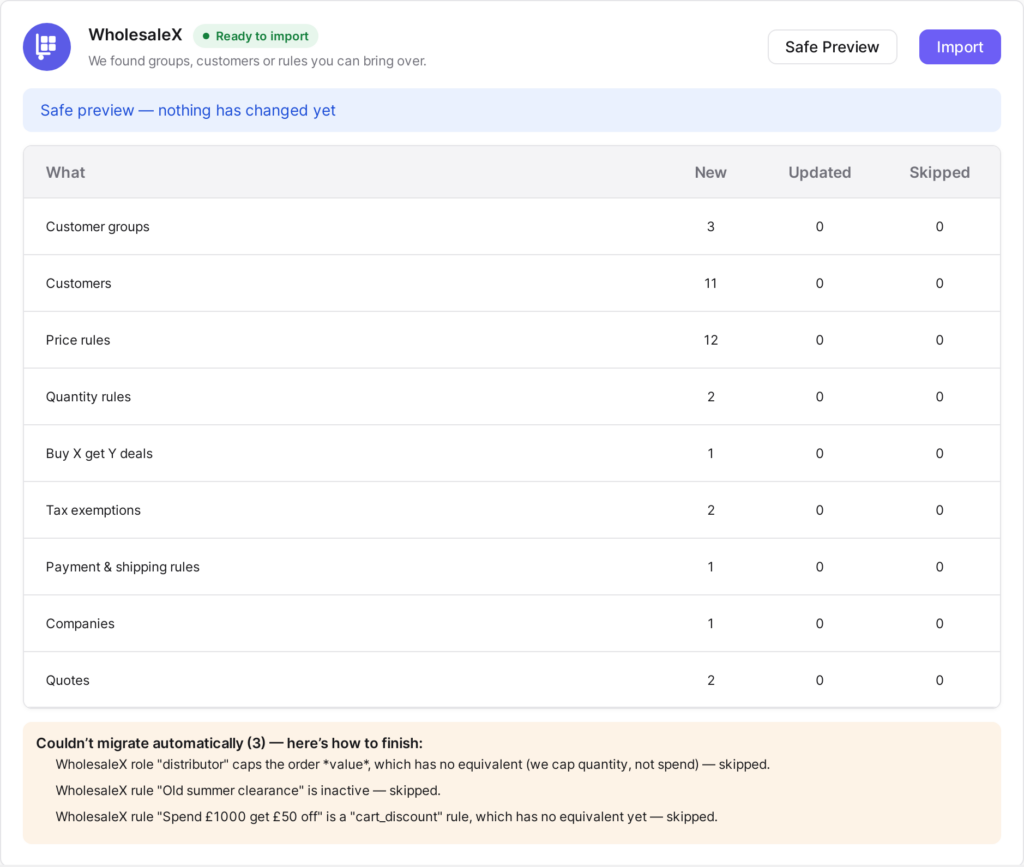
This writes nothing. You get a full report: the groups, customers, rules, companies, credit accounts and quotes it will create, plus a warning for every record it can’t map cleanly.
Step 5: Read the report — the heads-up and the warnings
Skim the counts to confirm they match your store. Then read the heads-up notices (like a private catalogue) and the couldn’t-migrate list — that’s your short manual to-do list.
The dry run reports exactly what it will create — and names anything it can’t map.
Step 6: Commit
Happy with the preview? Confirm, and the same import runs for real. Because it records a source-to-created map, you can safely re-run it later to pick up anything that changed on B2BKing in the meantime.
Step 7: Switch the storefront over
Once your prices check out (next section), deactivate B2BKing so only one plugin is resolving prices. Keep it installed-but-off for a while — that’s still your instant rollback.
Check your prices before you switch
Three checks, about five minutes, and you’ll know the migration is right before a real buyer does.
Check a price. In Pricing → Check a price, enter a product whose trade price you already know and a customer from an imported group. The tool shows the full precedence trail — which rule won and why — so you can watch the imported rule do its job.
View as customer. Use view-as-customer on a real imported buyer and walk the shop, cart and checkout. Confirm all three agree on the number. (B2B Suite resolves prices through one pipeline covering both the classic checkout and Cart & Checkout Blocks, so a correct price is correct everywhere.)
Clear the warnings. Work down the dry-run warning list and recreate the handful of items that needed a manual step.
Rolling back
Because nothing was ever written back to B2BKing, rollback is simple: deactivate B2B Suite, reactivate B2BKing. Your old store is exactly as you left it — which is why it’s safe to run the import, even the real committed one, on a live store.
FAQ
Does B2BKing have to stay active during the import?
No. The importer reads B2BKing’s data from WordPress storage directly, so it works whether the plugin is active or not. Most people leave it on until they’ve verified prices, then switch it off.
Will importing change or delete anything in B2BKing?
Never. The importer is read-only towards B2BKing — it only writes into B2B Suite’s own tables. That’s exactly why deactivating B2B Suite restores your previous setup.
Does it really bring across companies and credit?
Yes. Company accounts and their sub-users come across, and each company’s credit limit and current balance become a B2B Suite credit account with an opening ledger entry. (A user with credit but no company is flagged, since B2B Suite’s credit is per-company.) These are Pro features, so run the import with Pro active to bring them over.
Do I need Pro to migrate?
You can migrate and verify basic pricing on the free plugin. But B2BKing stores usually have several groups and lean on Pro-domain features (companies, credit, quotes, tax, visibility), so most will want Pro active during the import. Even then, everything imports on the free plugin and simply activates when you upgrade.
My whole B2BKing catalogue is hidden from the public. What happens?
The importer carries that across and makes your B2B Suite catalogue private too, and it warns you before committing. You can reopen the catalogue afterwards under Settings → Access & visibility.
Can I import, keep selling, and re-import later?
Yes — that’s the recommended way to switch a busy store. The importer maps each source record to what it created, so a second run updates instead of duplicating. Import early, keep taking orders on B2BKing, then re-import right before you flip the storefront over.
Conclusion
B2BKing holds a lot — groups, rules, product prices, companies, credit, offers — and the reason migrations feel scary is the fear of leaving some of it behind. The B2B Suite importer is built precisely so you don’t: it reads all of it, shows you exactly what will land in a preview you approve, names the few things it can’t map, and never touches B2BKing so the door back stays open.
Dokan turns WooCommerce into a multi-vendor marketplace, and it’s very good at it — vendors, sub-orders, payouts, the vendor dashboard. What Dokan doesn’t do is B2B: customer-group pricing per vendor, trade registration and approval, per-vendor invoices, wholesale ordering across several vendors at once.
That’s the gap Softminal B2B for Dokan fills. It’s a small bridge add-on that teaches B2B Suite about a Dokan marketplace. It does not replace Dokan — Dokan still owns vendors, sub-orders and the dashboard. The bridge layers wholesale on top, so “Wholesale customers get 15% off Acme’s whole catalogue” becomes a thing your marketplace can actually do.
This guide explains what the bridge does, what it needs, and how it fits together.
TL;DR
Softminal B2B for Dokan is a bridge add-on that makes B2B Suite vendor-aware on a Dokan marketplace. It doesn’t reinvent Dokan — it sits on top of it.
It adds vendor-scoped wholesale pricing & quantity rules, per-vendor invoices, marketplace trade registration & approval, cross-vendor bulk ordering, and a vendor-dashboard B2B pricing tab.
Vendor prices rank correctly against product, category and store-wide rules, on one precedence ladder — no guesswork about which discount wins.
It’s a free download, entitled by your B2B Suite Pro licence — no separate key. It activates only when B2B Suite (free core) + B2B Suite Pro + Dokan are all present; otherwise it stays idle with a single explanatory notice.
On a single-merchant store the underlying B2B seams cost nothing — they’re inert until a real marketplace vendor is involved.
Per-vendor net terms / credit / payouts are deliberately not in v1 — vendor settlement is a hard problem we’d rather do right than fast.
What the bridge is (and isn’t)
A marketplace plugin and a B2B plugin want to own different things, and the trick is to not make them fight.
It is a translator. Dokan already knows who the vendor of a product is (it’s the product’s author) and already splits a multi-vendor order into per-vendor sub-orders. B2B Suite already knows how to resolve a customer-group price and render an invoice. The bridge connects the two: it tells B2B Suite which vendor owns a product, and lets B2B price and invoice per vendor.
It is not a marketplace engine. It doesn’t touch vendor registration, payouts, commissions, store pages or the vendor dashboard’s existing tabs — Dokan keeps all of that. And it’s not a fork of B2B Suite: all the Dokan-specific knowledge lives in the bridge, so the core B2B plugins stay marketplace-agnostic and work exactly the same on a normal single-merchant store.
What you get
Five capabilities, each one B2B Suite already knows how to do — now applied per vendor:
Vendor-scoped pricing & quantity rules. The marketplace owner can price a whole vendor’s catalogue for a customer group — “Wholesale gets 15% off everything Acme sells” — plus per-vendor minimum quantities and order rules.
Per-vendor invoices. A multi-vendor order produces one invoice per vendor, each carrying that vendor’s own store name and details. Buyers and admins get a per-vendor download link on the parent order.
Marketplace trade registration & approval. The B2B trade-registration and approval flow works marketplace-wide, with optional per-vendor buyer approval for vendors who want to vet their own trade customers.
Cross-vendor bulk ordering. The bulk order form shows which vendor sells each product and prices every line by its vendor, so a wholesale buyer can fill one basket across many vendors.
Vendor self-service. A “B2B Pricing” tab in the Dokan vendor dashboard where each vendor sets their own wholesale pricing — for their own catalogue only.
How vendor pricing is decided
The moment you add vendor pricing on top of product, category and store-wide pricing, the obvious question is: when two discounts could apply, which one wins?
B2B Suite answers that with a single, fixed precedence ladder, and the vendor level slots into it cleanly:
customer → company → product → category → tag → vendor → global
Read left to right, most specific wins. A price set for a specific customer beats a company price; a product-specific rule beats a category rule; a vendor rule (all of Acme’s products) sits just above the store-wide global band. So a vendor-wide “15% off Acme” applies broadly, but a sharper product or category rule still takes precedence where you’ve set one. No surprises, and you can always confirm the outcome with Pricing → Check a price, which shows the whole precedence walk.
Because a vendor is simply the product’s author, vendor pricing needs no special product tagging and no extra pricing cache — it rides the machinery that’s already there.
Vendor self-service
Marketplace owners rarely want to hand-set wholesale pricing for every vendor forever. So beyond admin-set pricing, each vendor gets a “B2B Pricing” tab inside their normal Dokan dashboard.
There a vendor can set a catalogue-wide wholesale discount per customer group — for their own products only. The bridge stamps ownership on those rules and validates it on every write, so one vendor can never price, edit or even see another vendor’s rules. It’s the same pricing engine the marketplace owner uses, scoped down to one seller.
What it needs to run
The bridge activates only when all three of these are present:
B2B Suite for WooCommerce — the free core, new enough to expose the vendor seams.
B2B Suite for WooCommerce Pro — with a valid licence. The bridge is a free download entitled by your Pro licence, so there’s no separate key to buy or manage.
Dokan — Lite or Pro.
If any of those is missing, the bridge simply stays idle and shows a single admin notice telling you what’s needed. It never fatals or half-activates.
Because it’s a Pro-entitled add-on rather than a standalone plugin, it’s distributed through Softminal — every B2B Suite Pro customer can download it and it auto-updates with the same Pro licence.
What’s not in v1 (and why)
One thing is deliberately left out of the first release: per-vendor net terms, credit and payouts.
B2B Suite has a full net-terms and credit ledger, but on a marketplace, “pay on account” collides with vendor settlement — who is owed what, when a buyer pays late against an order split across five vendors, and how that reconciles with Dokan’s payouts. That’s a genuinely hard problem, and getting it subtly wrong means money that doesn’t add up. We’d rather ship it correctly later than approximately now.
Everything else B2B — group pricing, quantity rules, registration, invoices, quotes, bulk ordering — is in v1.
WCFM and other marketplaces aren’t supported yet either; vendor resolution sits behind a filter specifically so another marketplace bridge can plug in later without touching core.
Setting it up
Have the prerequisites active. B2B Suite (free) + B2B Suite Pro (licensed) + Dokan.
Install the bridge. Download Softminal B2B for Dokan from your Softminal account — it’s included with your Pro licence — and activate it. It confirms all three prerequisites and switches on.
Set vendor pricing. As the marketplace owner, add a price rule scoped to a vendor for a customer group (for example, Wholesale → Acme → 15% off). Or let vendors set their own from the B2B Pricing tab in their dashboard.
Check a price. Use Pricing → Check a price on one of that vendor’s products, as a customer in the group, and read the trail to confirm the vendor rule wins where it should.
Place a test multi-vendor order and confirm you get one invoice per vendor, each with the right store details.
FAQ
Does the bridge replace Dokan?
No. Dokan keeps ownership of vendors, sub-orders, payouts and the vendor dashboard. The bridge only adds the B2B layer — pricing, registration, invoices, bulk ordering — on top.
Do I need B2B Suite Pro?
Yes. The bridge is a free download, but it’s entitled by a valid B2B Suite Pro licence and won’t activate without Pro (and Dokan) present. There’s no separate key for the bridge.
Will it slow down or change my normal (non-marketplace) store?
No. All Dokan-specific logic lives in the bridge, and the vendor seams in core stay inert until a real marketplace vendor is involved. A single-merchant B2B store behaves exactly as it did before.
Which discount wins when a vendor rule and a product rule both apply?
The more specific one. The ladder is customer → company → product → category → tag → vendor → global, so a product- or category-specific rule beats a vendor-wide rule, which in turn beats the store-wide global band. Pricing → Check a price shows the full decision for any product and customer.
Can each vendor manage their own wholesale pricing?
Yes. Every vendor gets a “B2B Pricing” tab in their Dokan dashboard where they set a catalogue-wide wholesale discount per group — for their own products only. Ownership is enforced, so vendors can’t see or touch each other’s rules.
Can wholesale buyers order from several vendors at once?
Yes. The cross-vendor bulk order form shows which vendor sells each product and prices every line by its vendor, so one basket can span the whole marketplace.
What about pay-on-account and credit for marketplace buyers?
Not in v1. Per-vendor net terms, credit and payouts are deferred until vendor settlement can be done correctly.
Conclusion
A Dokan marketplace and a B2B store want the same customers to behave in two different ways — and until now you had to pick one. Softminal B2B for Dokan lets you run both: Dokan keeps doing multi-vendor commerce, B2B Suite adds group pricing, trade accounts, per-vendor invoices and bulk ordering, and the bridge makes the two agree on which vendor owns what.
It’s a free add-on for B2B Suite Pro customers, it stays out of the way until all three plugins are present, and it’s honest about the one thing it doesn’t do yet.
Get B2B Suite free on WordPress.org to start, then add Pro and the Dokan bridge when you’re ready to go multi-vendor. Questions? The docs cover every setting, and support is here to help.
WholesaleX does role-based wholesale pricing, and does it well. The case for moving shows up when your buyer stops being a person and becomes an organisation: several people ordering on one account, spend limits and approval, pay-on-account terms with a real credit ledger, quotes, VAT validation. That’s the ground B2B Suite is built on — and it’s one plugin with a free core, not a stack of add-ons.
The worry with any switch is the same one: will I lose my data? The honest answer is no — and you get to prove it to yourself before you commit. The importer runs as a dry run first, it never writes back to WholesaleX, and it’s safe to run twice. Nothing changes until you say so.
This guide walks the whole move, step by step, using the importer built into the free B2B Suite plugin. You don’t need to spend anything to migrate and check your prices.
TL;DR
The importer is in the free plugin: B2B Suite → Settings → Import. Pick WholesaleX as the source.
It reads WholesaleX straight from WordPress storage (options, user meta, post meta and its quote posts), so WholesaleX doesn’t need to be active and nothing is ever written back to it.
Customer roles, buyers, approval status, pricing rules and tiers, min/max quantity, buy-X-get-one, tax exemption, shipping access, sub-accounts, and request-a-quote all come across automatically.
Wallet balances, max-spend caps, price-visibility rules and custom registration fields need a manual step — each one is called out by name in the report, so nothing goes missing quietly.
Every import is a dry run first; nothing is written until you confirm. Running it again updates instead of duplicating, so you can import now and re-import at switchover.
The free plugin includes one customer group. If you have several wholesale roles, run the import with Pro active so every group comes across in one pass. Pro-domain data imports now and switches on when you upgrade.
What the importer actually does
Before you touch a setting, it helps to know how the migration is built — because that’s what makes it safe to try on a live store.
It reads, it doesn’t rewrite. The importer reads WholesaleX’s data from where WordPress already keeps it: plugin options, user meta, post meta, and its quote posts. It only ever writes into B2B Suite’s own groups, rules and tables. WholesaleX’s data is left exactly as it is.
WholesaleX doesn’t need to be active. Because the data lives in WordPress storage, the import works whether the WholesaleX plugin is switched on or off.
Every run is a preview by default. The import shows you the groups, customers, rules, companies and quotes it would create, plus a warning for every record it can’t map cleanly. Nothing is written until you confirm.
Running it twice is safe. The importer records a map of “this WholesaleX record became this B2B Suite record.” Run it again and it updates those same records instead of creating duplicates — which is exactly what you want when you import early, keep selling on WholesaleX for a week, then re-import right before the switchover.
That combination — read-only towards WholesaleX, dry run first, idempotent — means you can run the whole thing on your live store today and decide afterwards.
What comes across automatically
Most of your setup migrates in one pass, no manual work:
Customer roles → customer groups. Each WholesaleX role becomes a B2B Suite customer group. WholesaleX’s built-in guest and b2c roles are skipped — they aren’t real trade groups.
Buyers and their role. Every user is placed into the group that matches their role.
Approval status. Whether an account is approved or still pending carries over.
Pricing rules and quantity tiers. Percentage, fixed-amount and fixed-price rules come across, including tier breaks.
Minimum / maximum quantity and minimum order value. Role restrictions become quantity rules.
Companies and sub-accounts. A parent account becomes the company admin; its sub-accounts become company buyers.
Request-a-quote. WholesaleX quotes (from its request-a-quote add-on) import with their status intact.
What needs a manual step (and why)
A short list can’t be migrated automatically — not because it’s hard, but because copying it blindly would be wrong. The importer flags each of these in the dry-run report:
Wallet balances. A WholesaleX wallet is a prepaid balance your customer has topped up. B2B Suite’s credit is the opposite — an amount the customer owes you against net terms. Silently turning one into the other would misstate money, so the importer leaves it to you to set up credit terms deliberately.
Maximum order value caps. B2B Suite caps order quantity, not spend. A max-spend limit is flagged rather than guessed.
Per-role price visibility. WholesaleX’s show/hide rules don’t map one-to-one onto B2B Suite’s guest price-hiding, so you set your visibility rule by hand (it’s a single setting).
Custom registration fields. Recreate any extra fields you added to the sign-up form.
Message / conversation history. Not carried over — there’s little value in it once the quote itself has been imported.
Everything here is surfaced as a named warning with a note on how to finish it. That warning list is your manual to-do list — work down it and you’re done.
Where each WholesaleX thing lands
If you think in WholesaleX terms, here’s the quick translation. Items marked Pro are Pro features — but the importer still writes them on the free plugin now, and they switch on when you upgrade. You migrate everything today and unlock later.
In WholesaleX
In B2B Suite
How
Customer roles
Customer groups
Automatic
Role pricing rules & tiers
Price rules
Automatic
Min/max quantity restrictions
Quantity rules
Automatic
Buy-X-get-one
BOGO rules
Automatic
Role tax exemption
Tax-exempt groups
Automatic · Pro
Sub-accounts
Company accounts & users
Automatic · Pro
Request-a-quote
Quotes
Automatic · Pro
Wallet (prepaid)
Net terms & credit
Manual
Price visibility rules
Catalogue visibility
Manual
Migrate step by step
Seven steps, and steps 4–6 are the whole of it.
Step 1: Install B2B Suite (free)
Add B2B Suite for WooCommerce from WordPress.org alongside your existing setup. It won’t fight WholesaleX at this stage — you’re only reading data, not switching pricing engines yet.
Step 2: If you have more than one group, activate Pro
The free plugin ships with a single customer group. A store with several wholesale roles should run the import with Pro active so every group comes across in one pass. The dry run tells you how many roles it found either way, so you can decide before paying.
Step 3: Open Settings → Import and choose WholesaleX
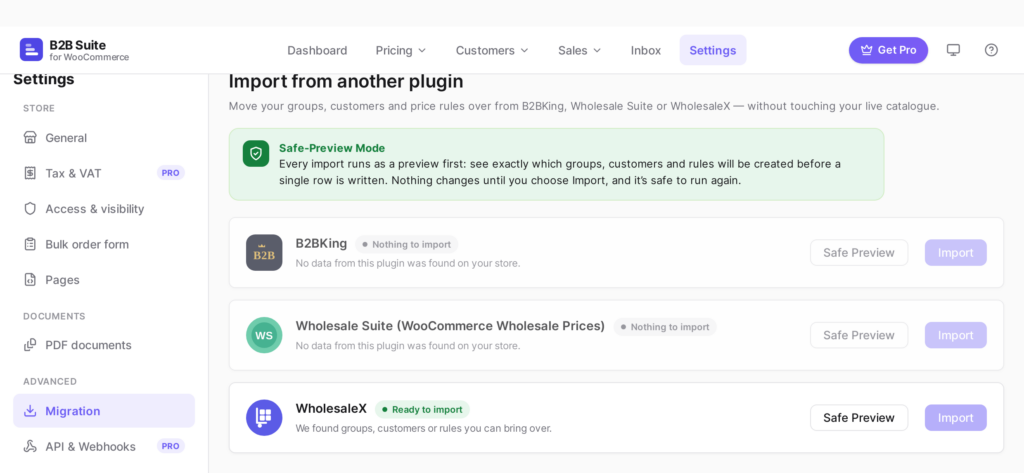
Go to B2B Suite → Settings → Import. The importer detects WholesaleX’s stored data automatically. Choose it as the source and pick which roles you want to bring over.
Settings → Import, with WholesaleX chosen as the source.
Step 4: Run the dry run
This writes nothing. You get a full report: the groups, customers, rules, companies and quotes it will create, and a warning for every record it can’t map cleanly.
Step 5: Read the report — especially the warnings
Skim the counts first and confirm they match what you expect (for example, “5 groups, 214 customers, 38 price rules”). Then read the heads-up notices and the couldn’t-migrate list — that’s the short manual to-do list from the section above.
The dry run reports exactly what it will create — and names anything it can’t map.
Step 6: Commit
Happy with the preview? Confirm, and the same import runs for real. Because it records a source-to-created map, you can safely re-run it later to pick up anything that changed on WholesaleX in the meantime.
Step 7: Switch the storefront over
Once your prices check out (next section), deactivate WholesaleX so only one plugin is resolving prices. Keep it installed-but-off for a while — that’s still your instant rollback.
Check your prices before you switch
Three checks, about five minutes, and you’ll know the migration is right before a real buyer does.
Check a price. In Pricing → Check a price, enter a product whose trade price you already know and a customer from an imported group. The tool shows the full precedence trail — which rule won and why — so you can watch the imported rule do its job.
View as customer. Use view-as-customer on a real imported buyer and walk the shop, cart and checkout. Confirm all three agree on the number. (B2B Suite resolves prices through one pipeline that covers both the classic checkout and Cart & Checkout Blocks, so a correct price is correct everywhere.)
Clear the warnings. Work down the dry-run warning list and recreate the handful of items that needed a manual step. Then you’re genuinely done.
Rolling back
Because nothing was ever written back to WholesaleX, rollback is simple: deactivate B2B Suite, reactivate WholesaleX. Your old store is exactly as you left it. This is why it’s safe to run the import — even the real, committed import — on a live store: the source data is never touched.
FAQ
Does WholesaleX have to stay active during the import?
No. The importer reads WholesaleX’s data from WordPress storage directly, so it works whether the plugin is active or not. Most people leave it on until they’ve verified prices, then switch it off.
Will importing change or delete anything in WholesaleX?
Never. The importer is read-only towards WholesaleX — it only writes into B2B Suite’s own groups, rules and tables. That’s exactly why deactivating B2B Suite restores your previous setup.
Do I need Pro to migrate?
No. The importer is in the free plugin, and you can migrate and verify pricing before spending anything. Pro matters in two cases: you have more than one customer group, or you’re bringing across Pro-domain data such as companies, tax exemptions or quotes. Even then the data imports on the free plugin and activates when you upgrade.
What happens to my customers’ wallet balances?
They’re flagged, not moved. A WholesaleX wallet is a prepaid balance the customer has topped up; B2B Suite’s credit is the opposite — an amount the customer owes you against net terms. Converting one into the other would misstate money, so the importer leaves it to you to set up credit terms deliberately.
Can I import, keep selling, and re-import later?
Yes — that’s the recommended way to switch a busy store. The importer maps each source record to what it created, so a second run updates those records instead of duplicating them. Import early, keep taking orders on WholesaleX, then re-import right before you flip the storefront over.
Does the migration cover the block checkout too?
Yes. B2B Suite controls prices through one pipeline that covers both the classic checkout and Cart & Checkout Blocks, so an imported price behaves the same everywhere.
Conclusion
Migrating off WholesaleX isn’t a leap of faith. It’s a preview you approve: read your roles, buyers, prices, companies and quotes into B2B Suite, check the numbers with the tools built for it, and switch the storefront over only when you’re sure. Nothing is written back to WholesaleX, so the door back is always open.
And once you’re across, the reason you moved is waiting for you — company accounts with sub-users, spend limits and approval, net terms with a credit ledger, quotes and VAT validation — all in the same plugin, on the same pricing pipeline as the free features you just imported into.