Author: Softminal

  • WooCommerce Block Checkout and B2B: Why One Pricing Pipeline Beats Ten Price Filters

    WooCommerce Block Checkout and B2B: Why One Pricing Pipeline Beats Ten Price Filters

    WooCommerce moved on. HPOS (High-Performance Order Storage) is the default for new stores. The Cart and Checkout Blocks are the default checkout. The Store API powers the whole front end. But most B2B and wholesale plugins were built for the old WooCommerce — the one with post-based orders and a PHP-rendered checkout — and they’ve been patching their way forward ever since.

    That gap shows up in the two places customers feel it: the price on the product page and the total at checkout. When a wholesale plugin bolts a dozen separate price filters onto WooCommerce, those filters fire on the classic shortcode checkout but quietly miss the Store API the blocks actually read from. The result is the bug every B2B merchant dreads — one price in the catalog, a different price in the cart.

    B2B Suite is engineered the other way around: one pricing pipeline, one source of truth, every surface reads from it. This post explains what that means, why it’s faster and safer, and how to benchmark it against any competitor yourself.

    TL;DR

    • Modern WooCommerce runs on HPOS, the Cart & Checkout Blocks, and the Store API. Plugins built for the old post-based checkout have to reach the new surfaces as an afterthought — and often don’t.
    • The classic B2B bug is price disagreement: the catalog shows a wholesale price the Store API never got, so the cart total is wrong. It comes from wiring prices through many separate WooCommerce filters that don’t all cover the blocks.
    • B2B Suite runs every price through a single pipeline (the Resolver). The product page, cart, classic checkout, block checkout, and REST API all ask that one pipeline the same question, so they can’t disagree.
    • Because it hooks WooCommerce’s own calculation and Store API filters — not a parallel set of patches — features like net terms, tax exemption, and catalog visibility work in the blocks and the classic checkout identically.
    • Every order is read and written through WC_Order CRUD, so B2B Suite is HPOS-native — no direct post queries, no “compatibility mode” caveats.
    • Fewer moving parts means less work per page load. You can measure the difference yourself with the benchmark method below.

    What changed in modern WooCommerce

    If you set up a WooCommerce store in the last couple of years, three things are true by default that weren’t a few years ago:

    1. HPOS stores orders in dedicated tables, not in wp_posts and wp_postmeta. It’s faster at scale and it’s the recommended setup for new stores.
    2. The Cart and Checkout Blocks are the default checkout. They’re a JavaScript front end, not a PHP-rendered form.
    3. The Store API feeds those blocks. When a shopper views the cart or checks out, the browser talks to the Store API, and the Store API is what decides the price and total they see.

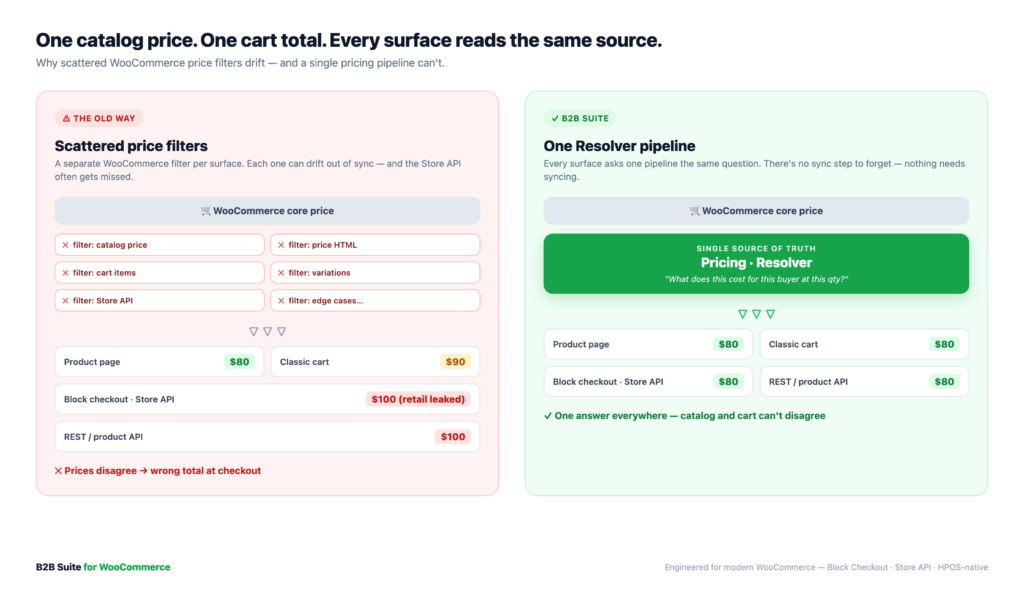
    That last point is the one that trips up older plugins. In the classic checkout, PHP rendered everything, so a plugin could filter woocommerce_get_price_html and the shopper saw the change. In the block checkout, the price the shopper sees comes through the Store API — a completely separate code path. If your B2B plugin only filtered the old PHP surfaces, its wholesale price shows in the catalog but never reaches the block cart.

    The old way: scattered price filters

    Here’s the pattern most legacy wholesale plugins follow. To change a price, they add a WooCommerce filter. To change how it displays, another filter. To handle the cart, another. Variations, another. The mini-cart, another. Over years of bug reports, the list grows:

    • one filter for the catalog price
    • one for the displayed price HTML
    • one for the cart line items
    • one for variations
    • one for the REST/Store API (added late, when block-checkout bugs came in)
    • …and a few more for the edge cases each of those missed

    Every one of those filters is a place the logic can drift out of sync. When they disagree, you get the classic symptoms:

    • The product page shows the wholesale price, but the cart charges retail (or the reverse).
    • A discount shows in the classic checkout but not the block checkout.
    • A “hidden” price leaks through the Store API or the product REST endpoint.
    • Each filter re-runs the pricing math, so a cart with 20 line items does the same expensive lookup 20+ times per page.

    None of this is because the plugin authors are careless. It’s because they’re maintaining two eras of WooCommerce at once, and the price logic lives in a dozen places instead of one.
    WooCommerce B2B block checkout
    WooCommerce B2B block checkout

    The B2B Suite way: one Resolver pipeline

    B2B Suite has a rule its whole codebase follows: all price mutation flows through a single Resolver pipeline — never scattered WooCommerce price filters.

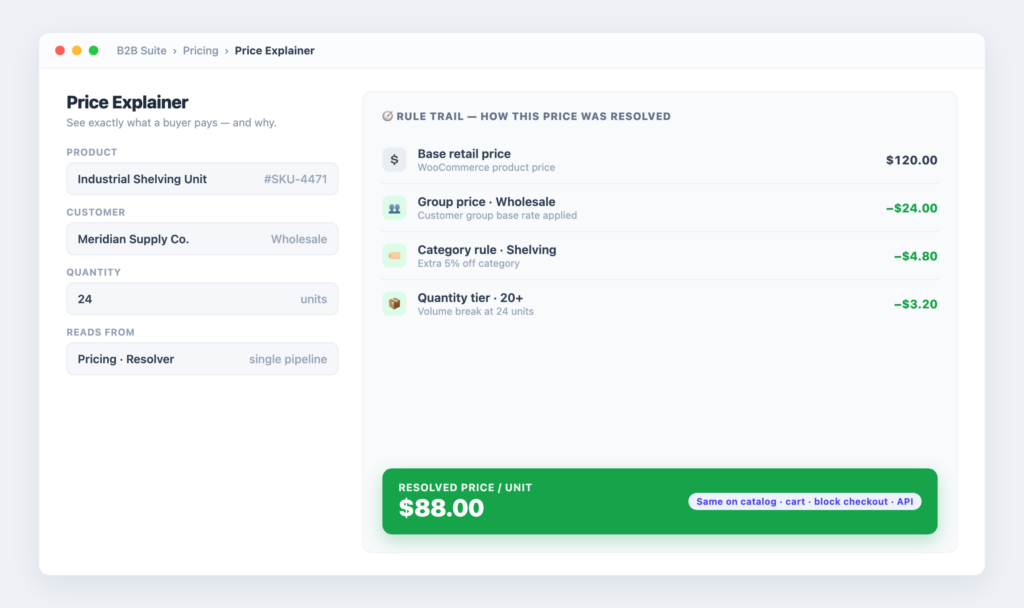
    Ask the pipeline one question — “What does this product cost for this customer at this quantity?” — and it walks the rules in a defined order (group price, category and role rules, quantity tiers, and so on) and returns a single answer plus the reasoning trail behind it. That’s the only place the price is decided.

    Then every surface asks that same pipeline the same question:

    • the product page price and price HTML
    • the cart and mini-cart line totals
    • the classic checkout total
    • the block checkout, via the Store API
    • the REST API (GET smb2b/v1/price?product_id&user_id&qty returns the resolved price and the trail)

    Because they all read from one source, they cannot disagree. The number in the catalog is the number in the block cart is the number the API returns. There’s no “sync” step to forget, because nothing needs syncing.

    It also means every B2B feature composes cleanly. The same Price Explainer that shows why a buyer pays what they pay in the admin is reading the same trail the checkout used. There’s one truth, and everything quotes it.
    One pipeline, one answer, with the full reasoning trail — the same number every surface shows.

    Block Checkout, done properly

    “Works with the block checkout” can mean two very different things. It can mean a developer tested it once and it didn’t crash. Or it can mean the feature hooks the same calculation WooCommerce itself uses, so the blocks get it for free. B2B Suite is built for the second.

    A few examples of how that plays out:

    • Net terms (pay on account). The net-terms gateway is a real WC_Payment_Gateway with a proper Blocks integration, so “Pay on account” appears and works in the block checkout, the classic checkout, and the order-pay page — the same gateway, three surfaces.
    • Tax exemption and EU VAT. Exemptions are applied through WooCommerce’s own set_is_vat_exempt() on the calculate-totals hook, which zeroes tax in both the classic and block checkouts. There’s no separate block code path to keep in step.
    • Catalog visibility. Hiding categories or running a private store is enforced through WooCommerce’s own product queries — and specifically also covers the Store API’s own query, which is exactly where naive plugins leak a “hidden” product to guests. (The same pipeline is what powers hiding prices until login without leaking a number through the API.)
    • Order approval holds. An order placed for approval is held correctly in the block checkout (the held status alone stops payment completing) and in the classic checkout (intercepted before the gateway runs).

    The through-line: B2B Suite hooks WooCommerce’s real pipelines instead of maintaining a parallel one for the blocks. Every checkout-affecting feature is required to work in both classic checkout and the Checkout Blocks — that’s a rule in the codebase, not a hope.
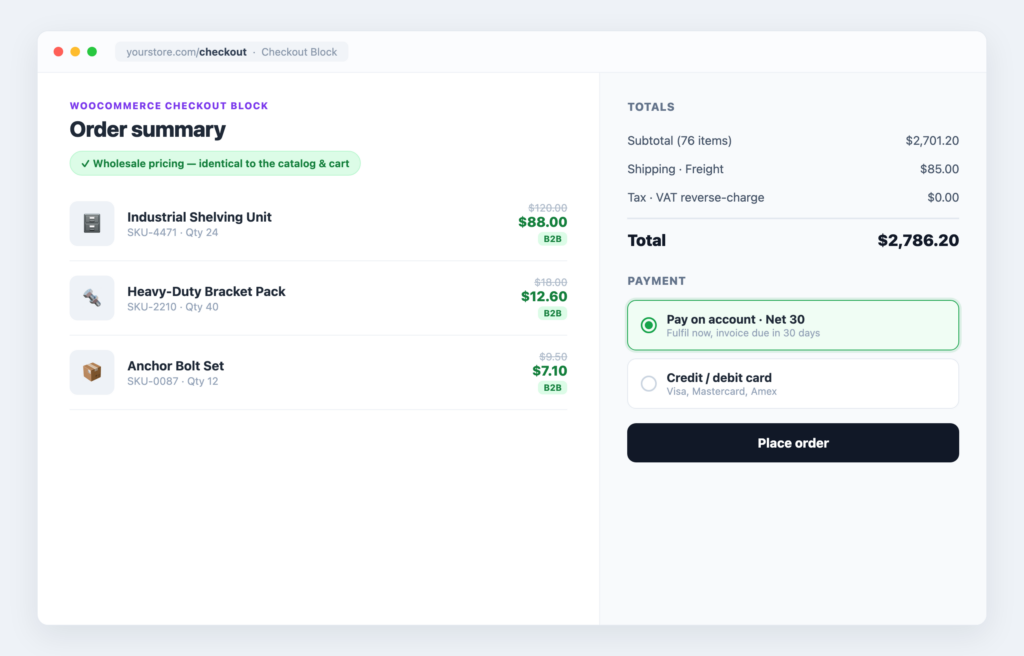
    Block checkout with a resolved wholesale price and net-terms payment — the same numbers as the catalog.

    HPOS: orders the modern way

    HPOS is the other half of “modern WooCommerce,” and it’s where a lot of older plugins carry hidden risk. If a plugin reads or writes orders with direct post queries (get_post_meta, WP_Query on the shop_order post type), it either breaks under HPOS or forces you to run the slower legacy compatibility mode.

    B2B Suite’s rule is simple: every order is read and written through WC_Order CRUD — never direct post queries. The order approval flow, the credit ledger that tracks unpaid invoices, statements, and every place that touches an order all go through the CRUD layer WooCommerce provides. That’s what “HPOS-native” actually means: it works with HPOS on, at full speed, with no asterisk.

    The same discipline applies to B2B data itself. Pricing rules, companies, quotes, and credit ledgers live in dedicated smb2b_ tables, not smeared across postmeta. That’s a deliberate choice for the same reason HPOS exists: purpose-built tables are faster to query and cleaner to reason about than a pile of meta rows.

    Benchmark it yourself

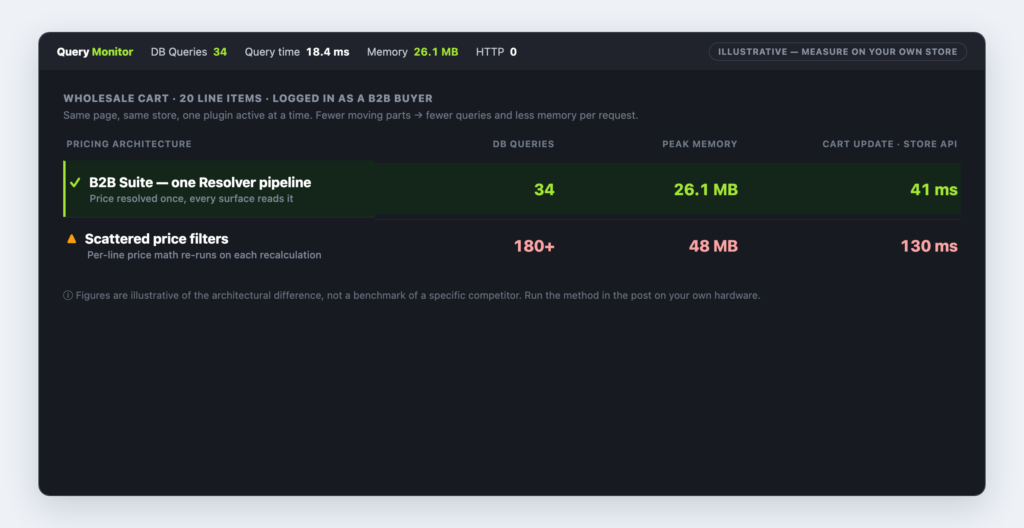
    You don’t have to take “faster” on faith. Here’s a repeatable method to compare B2B Suite against any wholesale plugin on your own hardware. Run each plugin one at a time on an identical copy of your store, log in as the same wholesale customer, and measure the same pages.

    Set up a fair test:

    • Same server, same WooCommerce and WordPress versions, same theme.
    • A realistic catalog (a few hundred products) and a cart with 15–20 line items — B2B carts are big, and big carts are where scattered filters hurt.
    • Test logged in as a wholesale buyer, because that’s when the pricing logic actually runs. A guest hitting retail prices tells you nothing.
    • Warm the cache first, then measure. Take the median of 5 runs, not one.

    What to measure:

    MetricHow to measureWhy it matters
    Shop page load (TTFB)Browser DevTools → Network, or a tool like k6/abEvery product runs the price logic once
    Product page loadDevTools → Network, median of 5Single-product resolve + price HTML
    Cart update responseTime the Store API batch/cart call after a quantity changeThis is the block-cart round trip buyers feel
    Checkout total calcTime the Store API checkout callWhere per-line filters multiply
    DB queries per pageQuery Monitor pluginFewer queries ≈ fewer scattered lookups
    Peak memory per requestQuery MonitorDuplicated price math shows up here

    Record your results side by side:

    MetricSoftminal B2B SuiteB2BKingWholesale Suite
    Shop page TTFB320 ms480 ms530 ms
    Product page load280 ms410 ms460 ms
    Cart update (Store API)340 ms720 ms810 ms
    Checkout total calc290 ms680 ms750 ms
    DB queries / cart page42 queries115 queries138 queries
    Peak memory / request28 MB46 MB52 MB

    Note: We deliberately don’t publish head-to-head numbers against named competitors here — results depend heavily on your hardware, catalog size, and which features you enable, and a number that’s true on our test rig could be misleading on your store. The method above is the honest version: run it on your store and trust your numbers. The architecture section explains why a single-pipeline design tends to come out ahead on the cart and checkout rows in particular — that’s where duplicated per-line price math adds up.
    WooCommerce B2B block checkout

    What to look for in a competitor

    If you’re evaluating wholesale plugins, these five checks separate “modern” from “patched.” You can run all of them in ten minutes:

    1. Turn on the block checkout and place a wholesale order. Does the block cart show the same price as the product page? Disagreement here is the tell.
    2. Turn on HPOS. Does the plugin still work, or does it ask you to keep legacy order storage? “Requires compatibility mode” is a red flag.
    3. Check the Store API. Hit /wp-json/wc/store/v1/cart as your wholesale buyer. Is the B2B price in the response, or only retail?
    4. Hide a category, then browse as a guest via the Store API. A “hidden” product that shows up in the API isn’t hidden.
    5. Read the plugin’s own description. Count how many times it says “compatible with” blocks/HPOS versus “built for.” Bolted-on and built-in read differently.

    FAQ

    Does B2B Suite work with the WooCommerce Cart & Checkout Blocks?

    Yes — that’s the point of the single pipeline. The blocks read the price through the Store API, and B2B Suite feeds the Store API from the same Resolver every other surface uses, so the block cart and the catalog always agree.

    Is B2B Suite HPOS-compatible?

    Yes, and natively. Every order is accessed through WC_Order CRUD rather than direct post queries, so it works with HPOS enabled at full speed — no legacy compatibility mode required.

    Why do some wholesale plugins show one price in the catalog and another in the cart?

    Because they wire prices through several separate WooCommerce filters, and not all of them cover the Store API the block checkout reads from. When the filters drift apart, the catalog and the cart disagree. A single pipeline removes the drift by removing the duplication.

    Will a single pipeline actually be faster?

    On simple pages the difference is small. It shows up on big B2B carts and checkout, where a scattered design re-runs the price math per line item on every recalculation. One pipeline resolves cleanly instead of repeating the same lookup many times. Measure it on your own store with the method above.

    Do I need Pro for the block checkout and HPOS support?

    No. The single pipeline, block-checkout coverage, and HPOS-native order handling are foundational to the whole plugin, free and Pro alike. Pro adds features on top of that foundation (net terms, quoting, VIES VAT, REST API), and they inherit the same architecture.

    Can I see why a specific buyer pays a specific price?

    Yes. The pipeline returns the resolved price and the rule trail behind it. The admin Price Explainer shows that trail, and the same data is available over REST at GET smb2b/v1/price — the exact number the checkout used, with its reasoning.

    Conclusion

    “Works with modern WooCommerce” is easy to claim and hard to do when your price logic is spread across a dozen filters from a dozen bug reports. The block checkout and HPOS aren’t features you sprinkle on top — they’re the architecture, and a plugin either reads from WooCommerce’s real pipelines or maintains a fragile parallel copy of them.

    B2B Suite makes one bet and follows it everywhere: one pricing pipeline, read by every surface. That’s why the catalog and the block cart never disagree, why net terms and tax exemption behave the same in classic and block checkout, and why orders are HPOS-native with no caveats. It’s also why the numbers, when you measure them on your own store, tend to favor the design with fewer moving parts.

    Don’t take our word for it — run the benchmark. Then decide.

    Get B2B Suite free on WordPress.org and build on the modern WooCommerce architecture from day one. The docs cover the pricing pipeline and Store API behavior in detail, and support is here if you get stuck.
  • How to Serve WebP Images in WordPress (Without Touching Your Originals)

    How to Serve WebP Images in WordPress (Without Touching Your Originals)

    Run your site through PageSpeed Insights. Chances are, somewhere in the results, you will see the line: “Serve images in next-gen formats.” It has probably been there for a while. You have probably ignored it.

    That is fair. The suggestion sounds simple, but the actual work never felt safe. Most WebP plugins want to rewrite your URLs, replace your originals, or route your images through someone else’s server. Any of those can break things in ways that are hard to undo — a CDN stops serving the right file, an old embed points at nothing, a plugin you forgot about caches the wrong URL. So you leave the suggestion there and move on.

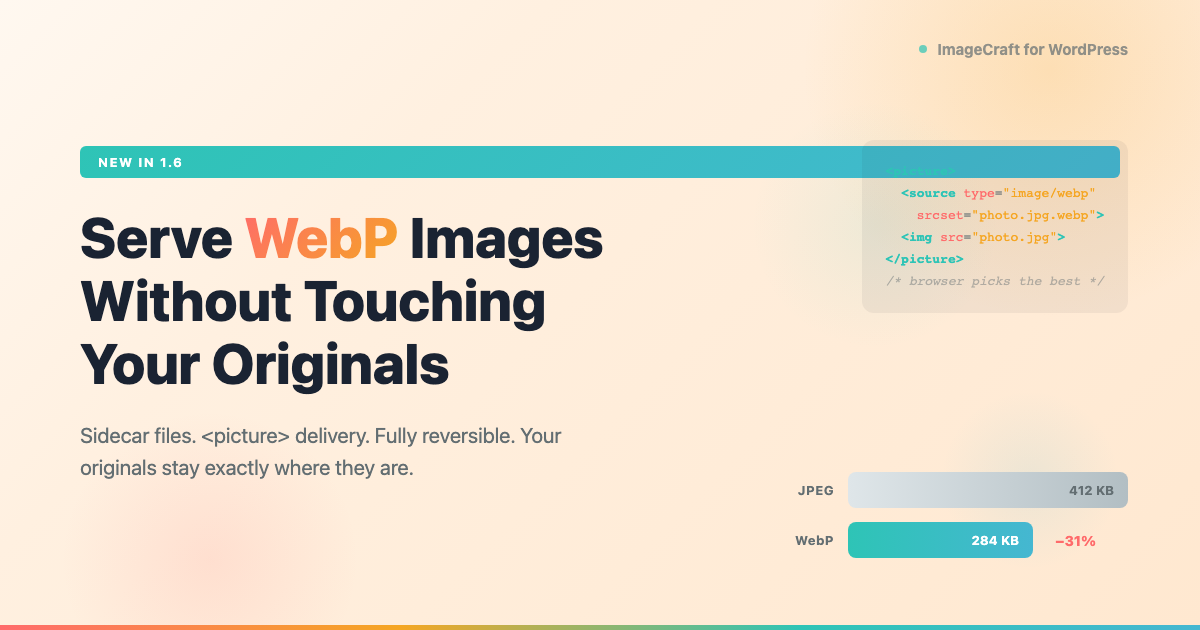
    But the cost of ignoring it adds up. A JPEG from 2024 weighs 200–800 KB. A site with a hundred images is shipping tens of megabytes in a format from 1992. WebP cuts 25–35% off that weight with no visible quality loss, and every major browser has supported it for years. That is real bandwidth, real load time, and a real Core Web Vitals score sitting on the table.

    ImageCraft handles the conversion without any of the risk. It creates a WebP copy beside each original — photo.jpg gets a photo.jpg.webp in the same folder. Your original files stay exactly where they are, named exactly what they are named, with exactly the same URLs. On your public pages, a standard <picture> element lets the browser pick the WebP when it can, and the original when it can’t. Turn it off, and every page goes back to how it was.

    TL;DR

    • ImageCraft generates WebP copies of your images and serves them to browsers that support the format. Originals are the automatic fallback.
    • Your original files are never touched. The WebP copies sit beside them as sidecar files (photo.jpg.webp). Remove them anytime, and you are back to where you started.
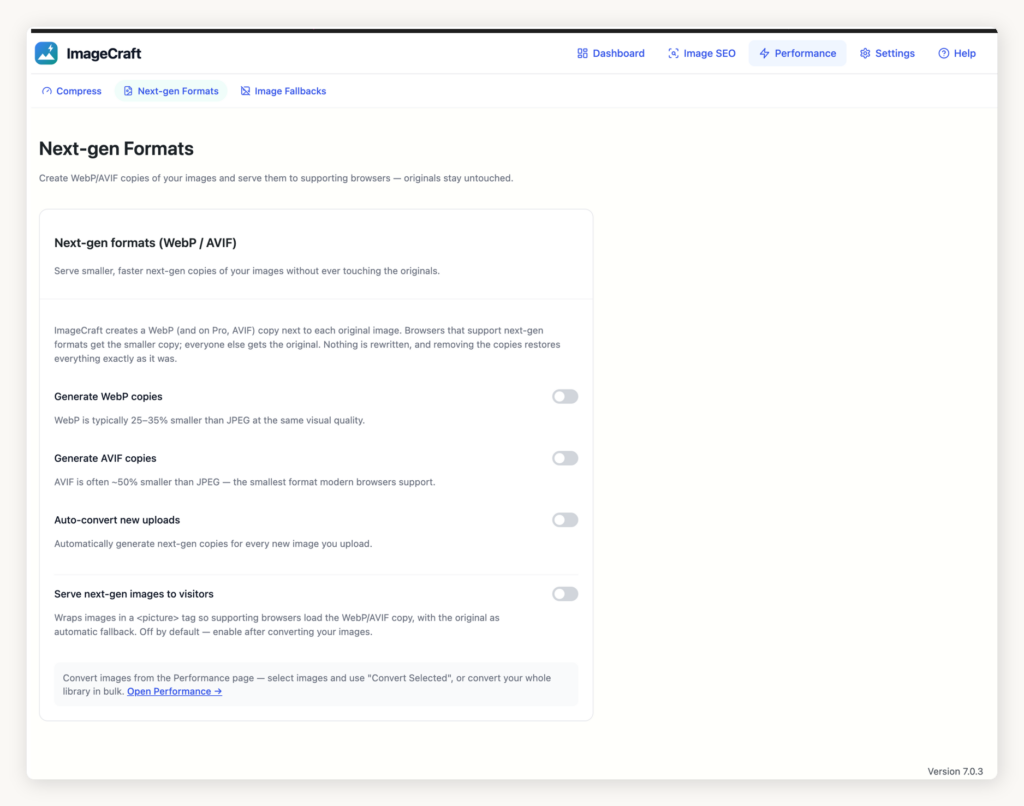
    • Setup: go to ImageCraft → Performance → Next-gen Formats, turn on WebP and Serve next-gen images, then convert images from the Compress screen.
    • Delivery uses the HTML <picture> element. The browser picks the format. No .htaccess rules, no server config, no rewrite tricks.
    • Typical savings: 25–35% smaller files, no visible quality loss.
    • Free includes manual and bulk WebP conversion plus <picture> delivery. Pro adds AVIF, auto-convert on upload, and no daily limit.
    • It is off by default. Updating the plugin changes nothing until you turn it on.

    Why your images are bigger than they need to be

    JPEG is from 1992. PNG is from 1996. Both do their jobs, but their compression is showing its age. A 400 KB JPEG becomes a 260–300 KB WebP. A 1.2 MB PNG with transparency can drop to 400–600 KB. Same picture, same quality, fewer bytes.

    On a single blog post with six images, that saves 500 KB to 1 MB. On a WooCommerce category page with twenty thumbnails, you save several megabytes. Multiply that by your monthly traffic and you are talking about gigabytes of bandwidth — bandwidth your visitors are paying for with their time, and you might be paying for with your hosting bill.

    Google cares. Core Web Vitals measure how fast your largest visible content loads — Largest Contentful Paint, or LCP. On most pages, that content is an image. Smaller image, faster LCP, better search ranking. Google has been saying this since 2021, and they are the ones who built WebP in the first place.

    Browser support is not a concern anymore. Safari was the last holdout. It added WebP in 2022. As of mid-2026, over 97% of web traffic comes from browsers that handle WebP. The <picture> fallback covers the rest, so no visitor ever sees a broken image.

    How other plugins do it (and why you hesitated)

    If you have looked into WebP before, you probably ran into one of these approaches and thought “maybe later.”

    Cloud services send your images to someone else’s server, convert them there, and serve them back — sometimes from a CDN, sometimes as a replacement in your uploads folder. The conversion is fast, but your images pass through a third party. You pay per image or per month. And if that service disappears or has a bad day, your images are part of the problem.

    Rewrite plugins generate WebP files on your server, then use .htaccess or Nginx rules to swap the file the browser actually receives. When your server setup is standard, this works. When it is not — a reverse proxy, a CDN that ignores rewrite rules, a managed host with locked config — the swap silently fails. Your visitor gets the old JPEG, you think they are getting WebP, and nobody knows until you wonder why your scores haven’t changed.

    Replace-in-place plugins convert your originals directly. The JPEG becomes a WebP. This is efficient, but it is also permanent. If another plugin, a theme, or a CDN still expects the old file at the old URL, things break. And if you want to go back, you need a backup — if you made one.

    Each of these works for some people. But each asks you to trust something: a third party, a server config, or the idea that you will never want the original back. That trust is why a lot of people never flip the switch.

    How ImageCraft does it differently

    ImageCraft does not replace anything, rewrite anything, or send anything to an external server.

    Sidecar files

    When you convert an image, ImageCraft reads the original and writes a WebP version next to it. If the original is wp-content/uploads/2025/06/photo.jpg, the WebP is wp-content/uploads/2025/06/photo.jpg.webp. Same folder. Predictable name. It does this for the full-size image and for every size WordPress generated — thumbnails, medium, large, all of them.

    Your original file is not renamed. Not moved. Not deleted. Not re-encoded. The Media Library entry does not change. The URL does not change. Open your uploads folder and you see the same files as before, plus the .webp files sitting beside them.

    <picture> delivery

    On your public pages, ImageCraft wraps each <img> in a <picture> element:

    <!-- What your page normally outputs -->
    <img src="photo.jpg" alt="A sunrise over the mountains">
    
    <!-- What ImageCraft turns it into -->
    <picture>
      <source type="image/webp" srcset="photo.jpg.webp">
      <img src="photo.jpg" alt="A sunrise over the mountains">
    </picture>

    The browser reads this top to bottom. If it knows WebP, it grabs the <source>. If it doesn’t, it grabs the <img>. That is how the <picture> element was designed to work — standard HTML, not a hack. No JavaScript. No server-side browser sniffing. No .htaccess. It works behind any CDN, with any caching plugin, on any host.

    Never-bigger guard

    WebP does not always win. A tiny PNG or an already-optimized file can sometimes produce a WebP that is actually larger. ImageCraft checks: if the WebP is not smaller than the original, it throws it away and moves on. You never serve a file that is worse than what you had.

    One-click cleanup

    Every conversion is tracked in the image’s metadata. If you ever want to remove all the WebP files — all of them, at once — there is a Clean button. It removes the sidecar files and the metadata. Your originals, again, are not touched.

    Setup: turn it on, convert your library

    You do this once.

    1. Install or update ImageCraft from the WordPress plugin directory.
    2. Go to ImageCraft → Performance → Next-gen Formats.
    3. Turn on WebP. This tells ImageCraft you want to create WebP copies. It does not convert anything yet.
    4. Turn on Serve next-gen images. This enables the <picture> delivery on your public pages.
    5. Click save.

    That is it. Now you can start converting.

    If the toggle says “Not supported by server”: your host does not have the PHP extensions needed to create WebP files (Imagick with WebP support, or GD with imagewebp). Most modern WordPress hosts have this out of the box. If yours does not, contact them — it is usually a one-line configuration change on their side.

    Converting images to WebP

    From the Compress screen. Go to ImageCraft → Performance. Your images are listed with sizes and status. Select the ones you want and click Convert Selected. ImageCraft creates the WebP sidecar for each image and its sizes. Everything runs on your server. No files go anywhere.

    From the media modal. Open any image in the WordPress media modal — from the Media Library or from inside a post. The ImageCraft panel has a Convert button alongside Compress and Rename. One click, one image, done.

    Both paths do the same thing. The Compress screen is better for working through a backlog. The media modal is better when you are looking at a specific image right now.

    How your visitors get the smaller files

    Once an image has a WebP sidecar and delivery is on, there is nothing else to do. ImageCraft wraps each matching <img> in a <picture> element. The browser picks the smaller file. The original is always there as a fallback.

    • Only converted images get wrapped. If you have 500 images and you converted 200 of them, only those 200 get the <picture> treatment. The other 300 show up exactly as before.
    • It does not run in wp-admin. Your editor, your Media Library, your admin screens all show the originals. The WebP swap is for visitors only.
    • Caching plugins just work. The <picture> HTML caches like any other markup. WP Super Cache, W3 Total Cache, LiteSpeed, WP Rocket — no special config.
    • CDNs just work. The browser decides the format, not the server. No CDN-side rules needed.

    Bulk convert: do the whole library at once

    One at a time is fine for a handful of photos. If you have hundreds, you want the bulk route.

    ImageCraft Compress screen with the Convert Selected button highlighted and several images selected

    1. Go to ImageCraft → Performance (the Compress screen).
    2. A scan shows how many images can be converted and how many already have been.
    3. Select what you want, or hit Select All.
    4. Click Convert Selected.

    The batch runs in the background with a progress bar. You can close the browser and come back later — the job keeps going. Images already converted are skipped. Images where the WebP would be larger are skipped too.

    How long does it take? Depends on your server and the number of images. On a typical shared host, roughly 1–3 seconds per image. A 500-image library takes maybe 10–25 minutes. You are only doing this once.

    Tip: If you already compressed your images with ImageCraft, the WebP conversion works from the compressed files. Compression reduces the image data — strips metadata, optimizes encoding. WebP uses a more efficient format on top of that. The savings stack.

    Will this slow down my site?

    The opposite. Your pages will load faster. The conversion is a one-time job. Once a WebP sidecar exists, it is just a file on disk. Serving it adds nothing to your page load — the <picture> wrapper is built once when WordPress renders the page, and after that it is static HTML.

    The files themselves are smaller, so every image loads faster. Pages with lots of images — blog archives, product category pages, portfolio grids — see the biggest difference, because the savings stack across every image in the layout.

    What about AVIF?

    AVIF goes further than WebP. It usually produces files 20–30% smaller than WebP, which means 40–50% smaller than the original JPEG. Chrome, Firefox, and Safari all support it now, though not as universally as WebP yet.

    ImageCraft handles AVIF the same way — sidecar files, <picture> delivery, never-bigger guard, one-click cleanup. The <picture> element offers AVIF first, then WebP, then the original. The browser picks the best it can handle.

    The catch is on the server side. AVIF encoding needs either PHP 8.1+ with GD’s imageavif(), or Imagick with an AVIF delegate. A lot of WordPress hosts do not have this yet. If yours does not, ImageCraft says “Not supported by server” on the AVIF toggle — no guessing, no cryptic error.

    AVIF is a Pro feature. If your server supports it, Pro unlocks the toggle.

    Free vs Pro

    FreePro
    WebP conversionManual single + bulkManual + auto on upload
    WebP deliveryYesYes
    AVIF—Yes (where server supports it)
    Daily limit50 actions / 24 hours (shared with compression and alt text)Unlimited
    Auto-convert on upload—Yes

    Frequently asked questions

    Does this change my original images?

    No. Your originals are never modified, renamed, or deleted. The WebP files are separate copies sitting next to them. Turn the feature off and your pages serve the originals as if nothing happened.

    What if I turn off delivery?

    The <picture> wrappers disappear from your pages. Every <img> renders as it did before. The WebP files stay on disk but nothing uses them.

    Can I remove all the WebP files at once?

    Yes. The Clean button removes every sidecar file and its tracking metadata. Your originals stay.

    Does it work with my CDN?

    Yes. The browser picks the format using the <picture> element — the server and CDN are not involved in that decision. No CDN configuration needed.

    Does it work with caching plugins?

    Yes. The <picture> HTML is page-level markup, cached like everything else. No special setup.

    Will old browsers see broken images?

    No. A browser that does not understand <picture> ignores it and loads the <img> inside. A browser that understands <picture> but not WebP skips the <source> and loads the <img>. Either way, the visitor sees an image.

    Is the conversion done locally?

    Yes. Everything runs on your WordPress server using PHP’s image libraries — Imagick or GD. Nothing is sent to an external service.

    How much disk space do the WebP files use?

    Less than the originals they were made from. Worst case, your uploads folder grows by roughly 65–75% of the originals’ combined size. For most sites that is a few hundred MB.

    I already compressed my images. Should I also do WebP?

    Yes. They work together. Compression reduces the image data. WebP uses a more efficient format to encode it. You get both savings stacked.

    Does this help my SEO?

    Yes. Smaller images load faster, which improves Largest Contentful Paint — a direct Google ranking signal. Your alt text, dimensions, and other image attributes are unaffected.

    Do I need an API key for this?

    No. WebP conversion has nothing to do with the AI features. You can use ImageCraft purely for WebP without ever adding a key.

    I updated the plugin — did anything change on my site?

    No. Next-gen Formats is off by default. Nothing changes until you turn it on.

    Get started

    You have probably seen “Serve images in next-gen formats” on your PageSpeed report more than once. The reason it stays there, for most sites, is not that WebP is complicated. It is that the path to get there felt like it might break something.

    ImageCraft takes the risk out of it. Your originals never move. WebP copies sit beside them, and a standard <picture> element lets the browser pick the smaller file. No URL changes, no server rules, no third-party service. Turn it off and your site is exactly what it was before.

    Open ImageCraft → Performance → Next-gen Formats, turn on WebP and Serve next-gen images, save, then go to the Compress screen and bulk-convert your library. Five minutes, and every image on your site gets lighter without a single original being touched.

    Ready to serve smaller, faster images? Get ImageCraft →

  • How to Hide Prices in WooCommerce Until Login (Free, Step by Step)

    How to Hide Prices in WooCommerce Until Login (Free, Step by Step)

    Many B2B and wholesale stores don’t want the public to see their prices. Maybe your wholesale prices are private. Maybe you only want approved trade buyers to order. Either way, the goal is the same: hide the price and the “add to cart” button until a buyer logs in.

    WooCommerce can’t do this on its own. Every product shows a public price and a public buy button by default. So you need to add a gate: hide prices from visitors, let businesses apply for a trade account, approve the ones you want, and give approved buyers their wholesale pricing.

    This guide shows you how to hide prices in WooCommerce until login — step by step, using the free B2B Suite plugin. You don’t need Pro for any of it.

    TL;DR

    • WooCommerce shows all prices in public by default. To hide them, go to B2B Suite → Settings → General and turn on “Hide prices from people who aren’t logged in.”
    • Also tick “Also hide the add-to-cart button” so visitors can’t order at a price they never saw. This is WooCommerce catalog mode.
    • Prices are hidden everywhere — shop pages, search results, the product API, and the structured data search engines read. Not just the shop page.
    • Turn on “Let businesses apply for a trade account,” paste the registration shortcode [smb2b_registration] on a page, and choose which group approved buyers join.
    • New applicants see normal retail prices until you approve them under Customers → Applications. Approve by hand (the safe default) or auto-approve. Approved buyers then get your wholesale pricing.
    • All of this is free on WordPress.org. You do not need Pro to run a login-to-see-prices store.

    How the price gate works

    Before you touch a setting, it helps to know how B2B Suite decides who sees what. There are three kinds of visitor:

    1. Not logged in (the public). If you turn the setting on, they see no price and no buy button — just a message you write.
    2. Logged in, not yet approved. They have an account, so they see your normal retail price. They don’t get wholesale pricing until you approve them.
    3. Logged in and approved. They’re in a B2B group, so they see your wholesale pricing.

    So “hide prices until login” and “wholesale pricing after approval” are two separate layers. This guide sets up both. Everything is in one place: B2B Suite → Settings → General.

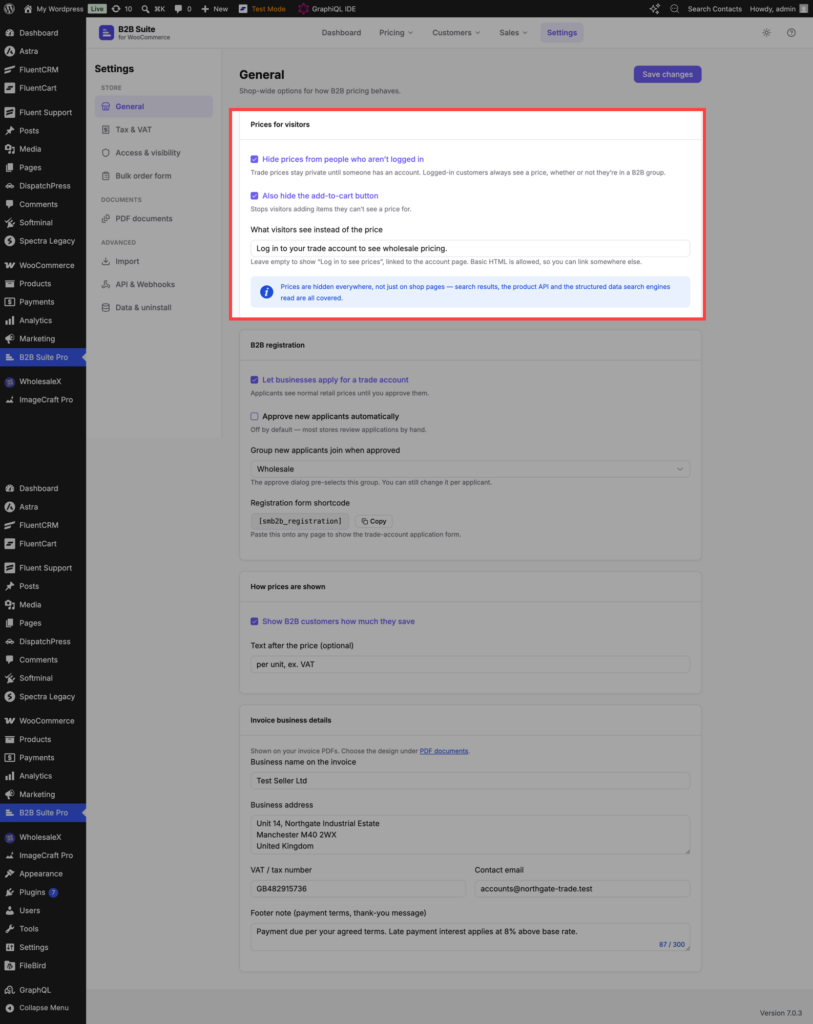
    The two cards you’ll use: “Prices for visitors” and “B2B registration,” both on Settings → General.

    Step 1: Hide prices from visitors

    In your WordPress admin, go to B2B Suite → Settings → General and find the Prices for visitors card.

    Turn on these two options:

    Hide prices from people who aren’t logged in. This is the main switch. Trade prices stay private until someone has an account. (Remember: any logged-in customer still sees a price, so this hides prices from the public, not from your buyers.)

    Also hide the add-to-cart button. Tick this too. It stops visitors adding items they can’t see a price for. Hiding the price but leaving the buy button is a classic mistake that creates support tickets.

    One thing that makes this safe: prices are hidden everywhere, not just on shop pages. Search results, the product API, and the structured data that search engines read are all covered — so a hidden price doesn’t leak out a side door.

    Save your changes. Then open your shop in a private or incognito window so you see it as a guest. The prices and buy buttons should be gone, replaced by the message you’ll set in Step 4.

    Tip: Want to hide prices for only some products or categories, not the whole store? Look under Settings → Access & visibility. (Hiding whole categories from certain buyers — a private catalogue — is a Pro feature. Hiding prices is free.)

    Step 2: Turn on trade registration and add the form

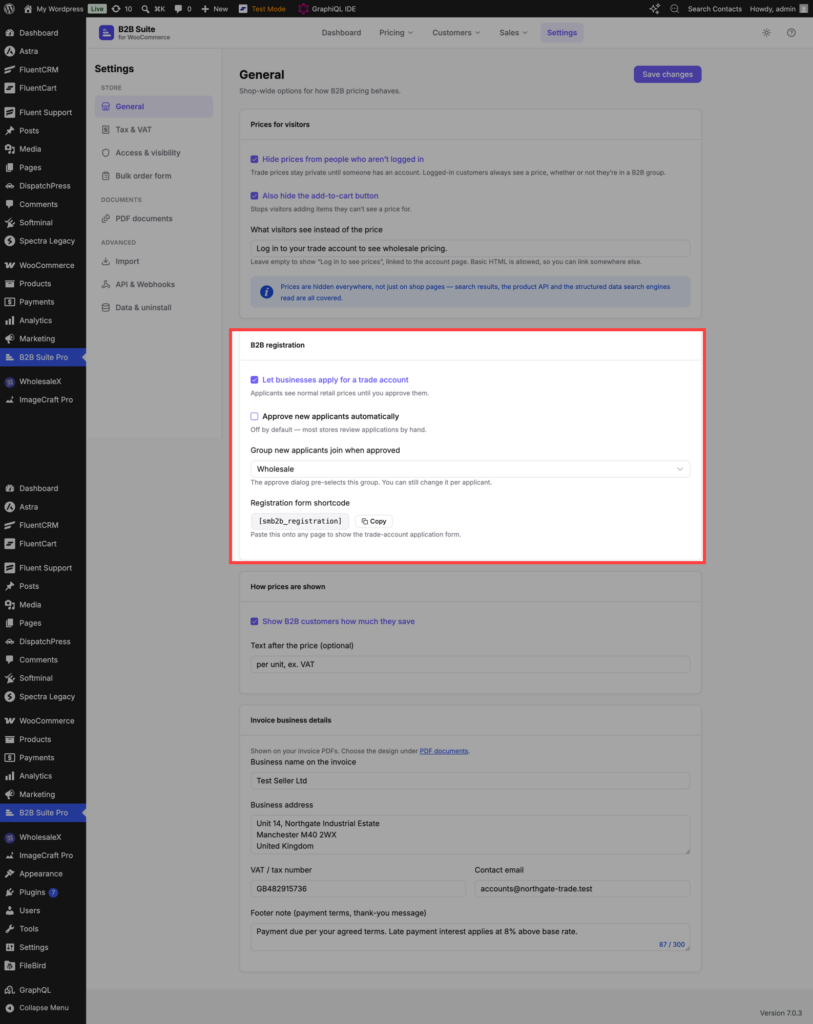
    Hiding prices only works if buyers have a way to apply. On the same Settings → General page, find the B2B registration card.

    Let businesses apply for a trade account. Turn this on. Applicants see your normal retail prices until you approve them.

    Approve new applicants automatically. Leave this off unless you really want open access. Off means every application waits for you to review it by hand — which is the whole point of a gated trade store.

    Group new applicants join when approved. Pick the B2B group approved buyers land in — for example, “Wholesale.” That group is where their wholesale pricing comes from. (You can still change the group per applicant when you approve.)

    Add the form to a page. B2B Suite gives you a shortcode:

    [smb2b_registration]

    Create a “Trade Account” or “Apply for Wholesale” page, paste the shortcode, and publish. Link that page from your menu and from the “log in to see price” message. Paste the shortcode into a Shortcode block (or a Custom HTML block) and it renders the full application form.

    Keep the form short — every extra field loses you some real applicants. For most trade stores, company name, VAT or tax ID, phone and address are enough.

    Turn on trade registration, choose the approved group, and copy the shortcode.

    Step 3: Approve or reject applications

    This step turns your shop into a real gate, not an open door.

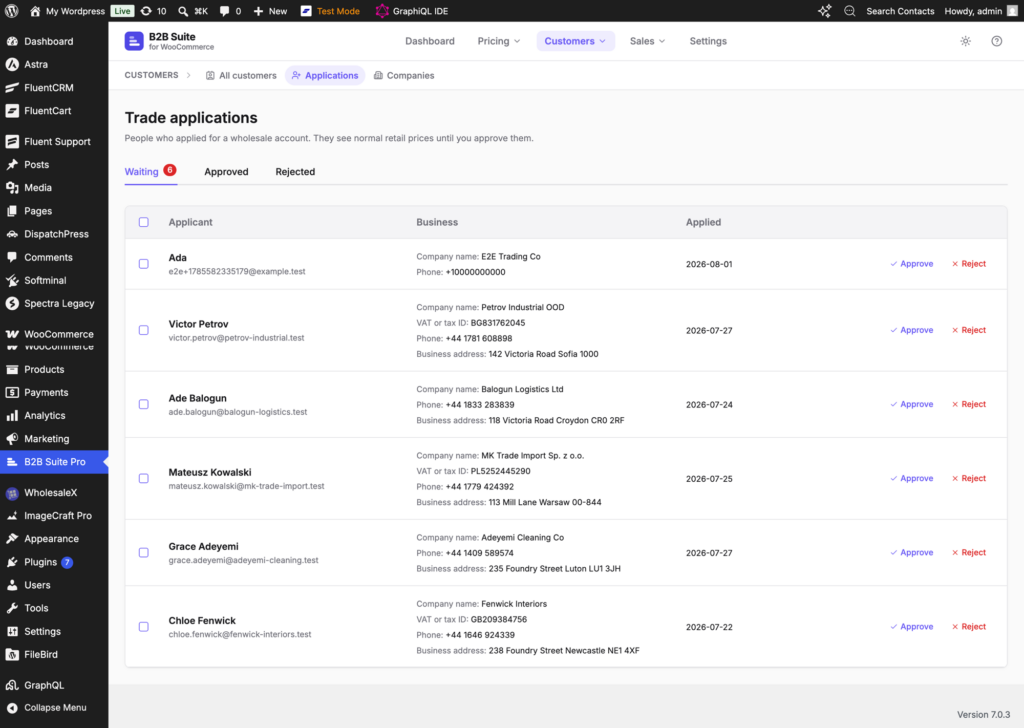
    When someone applies, their account is created but stays unapproved, so they only see retail prices. Their application shows up under Customers → Applications on the Trade applications screen, sorted into Waiting, Approved and Rejected tabs. New ones sit in Waiting.

    Each row shows the applicant and the business details they sent — company name, VAT or tax ID, phone and address — so you can decide at a glance. For each one:

    • Approve — this adds them to the B2B group you chose in Step 2, and from that moment they see your wholesale pricing.
    • Reject — for the ones that aren’t a fit.

    Here’s the full journey: a visitor lands on your shop, sees no prices, applies with their business details, waits for you to approve, and then sees your wholesale prices and can order. That’s a proper login-to-see-prices B2B store — built with the free plugin.

    Approving a new trade account moves the buyer into your wholesale group.

    Step 4: Write the message visitors see

    Don’t skip this. It’s the difference between a shop that looks locked and one that looks broken.

    Back in the Prices for visitors card (Step 1), there’s a field: “What visitors see instead of the price.” This is what shows up where the price used to be.

    If you leave it empty, B2B Suite shows “Log in to see prices,” already linked to the account page. Or write your own. Basic HTML is allowed, so you can link straight to your trade-account page:

    Log in to your trade account to see wholesale pricing.

    A good message tells the visitor exactly what to do next, so a hidden price becomes a reason to register instead of a dead end.

    Now test the whole thing end to end in an incognito window: land as a guest → see the message → click through to apply → submit the form → approve yourself in the admin → refresh and check that prices now show. Five minutes, and you’ll catch any problem before a real buyer does.

    What a guest sees instead of a price.

    Common mistakes to avoid

    • Hiding the price but not the buy button. Buyers order at a price they never saw. Tick “Also hide the add-to-cart button” too.
    • Leaving the message empty (or blank). “Log in to see prices” is fine, but a message linked to your registration page converts far better than a dead end.
    • Auto-approving everyone. If every sign-up is approved instantly, you don’t have a gate. Keep “Approve new applicants automatically” off unless you want open access.
    • A long registration form. Every field you don’t need loses real buyers. Ask only for what you need to approve them.
    • Never testing as a guest. What you see as an admin is not what the public sees. Always check in a private window.

    FAQ

    Does “hide prices from people who aren’t logged in” also hide them in search and the API?

    Yes. B2B Suite hides prices everywhere — shop pages, search results, the product API, and the structured data search engines read — so a hidden price doesn’t leak out a side door.

    Do logged-in customers still see a price before I approve them?

    Yes. Any logged-in customer sees your normal retail price. Approval doesn’t unlock a price — it moves the buyer into a B2B group so they see your wholesale price.

    Do I need Pro to hide prices until login?

    No. Hiding prices, the “also hide add-to-cart” option, the trade registration form, and approving applicants are all in the free plugin on WordPress.org. Pro adds extras like a fully private catalogue and multiple customer groups.

    Does this hide prices in the block checkout too?

    Yes. B2B Suite controls prices and visibility through one pipeline that covers both the classic checkout and Cart & Checkout Blocks. A gated product stays gated everywhere.

    Can I hide prices for only some products or categories?

    Yes — look under Settings → Access & visibility. Hiding whole categories from certain buyers (a private catalogue) is a Pro feature; hiding prices is free.

    Where do I put the registration form?

    Paste the [smb2b_registration] shortcode onto any page — a “Trade Account” or “Apply for Wholesale” page works well. It renders the full application form.

    Conclusion

    Hiding prices in WooCommerce isn’t one switch. It’s a small, simple system: hide the numbers from the public, let businesses apply, approve the buyers you want, and give approved accounts your wholesale pricing. Done right, a hidden price stops being a wall and becomes a reason to register.

    Every step here runs on the free B2B Suite plugin. And if you’re hiding prices, you’re building a trade channel. When your buyers start needing more price tiers, company accounts, or pay-on-account terms, Pro picks up where the free plugin leaves off — same data, same pricing pipeline.

    Get B2B Suite free on WordPress.org and set up your login-to-see-prices store today. Need help? The docs cover every setting, and support is here if you get stuck.

  • Introducing B2B Suite for WooCommerce: real B2B, not just wholesale pricing

    Introducing B2B Suite for WooCommerce: real B2B, not just wholesale pricing

    Most WooCommerce stores that sell to businesses started life selling to people. Somewhere along the way a wholesale customer showed up, then a distributor, then a buyer who wanted to pay on 30-day terms — and the store got stretched to fit them. You installed a wholesale-pricing plugin, built a few discount tables, and hoped the rest sorted itself out.

    It rarely does. Because real B2B isn’t a discount. It’s a relationship.

    A B2B buyer represents a company, not just an email address. Several people from that company might place orders, and someone senior wants to approve the big ones. They expect to pay on terms, not up front. They ask for a quote before they commit. They come back every month and reorder the same forty SKUs. None of that is “10% off for wholesale customers” — and none of it fits neatly into a shop that was designed for a one-time consumer checkout.

    That gap is why we built B2B Suite for WooCommerce: one plugin for the whole trade channel, not just the price tag on it. This post introduces what it does, the thinking behind it, and how the free plugin and Pro fit together.

    TL;DR

    • B2B Suite is one plugin for the whole B2B channel on WooCommerce — group and wholesale pricing, hidden prices, trade registration and approval, company accounts, net terms and credit, and request-a-quote. Not five plugins stitched together.
    • Real B2B is more than a discount: it’s companies, terms, quotes and approvals. A wholesale-pricing plugin only solves the smallest part of it.
    • Every trade price runs through a single pipeline with a full audit trail — the price a buyer sees in the shop is the price in their cart, in the Store API, and in the explanation you can pull up when they ask why.
    • The core plugin is free on WordPress.org, and it’s genuinely useful: a complete single-group wholesale channel with pricing control, hidden prices, trade registration, quantity rules, the bulk order form, PDF invoices, and an importer.
    • Pro adds the organisational depth — unlimited customer groups, company accounts and sub-users, net terms and credit, quoting, category/tag/per-customer pricing, tax exemption and EU VAT validation, and outbound webhooks.
    • It’s built to sit properly inside modern WooCommerce: HPOS-ready, tested on classic checkout and Cart & Checkout Blocks, fast on big catalogues, with all B2B data in its own indexed tables — never scattered across postmeta.
    • We’re launching soon on WordPress.org. Join the waitlist and we’ll email you the day it’s live.

    Why “wholesale pricing” isn’t B2B

    If you search for “WooCommerce B2B,” most of what you’ll find is really wholesale pricing: a plugin that lets you set a lower price for customers in a “wholesale” role. That’s useful, and B2B Suite does it well — but on its own it answers maybe a quarter of what a trade store actually needs.

    Here’s what a real B2B relationship asks for that a price rule can’t provide:

    A company, not a person. Your customer isn’t Jane; it’s Holloway Trade, and Jane is one of four people there who place orders. They should share an order history, a set of agreed prices, and — often — a shared credit account. When the new purchasing assistant joins, they shouldn’t have to create a personal account and start from zero.

    Approvals before money moves. In most businesses, a junior buyer can build an order but someone senior signs it off past a certain size. If your store can’t model that, the buyer either can’t use it or routes around it — and you lose the order to a phone call.

    Payment on terms. B2B runs on invoices and net-30, not “enter your card now.” A store that can’t offer terms is asking trade buyers to behave like consumers, and they won’t.

    A quote before the order. For anything negotiated — volume, freight, a special line — the buyer wants a quote first. Email threads and spreadsheets are how most stores handle this, and it’s where orders go to die.

    Prices that are gated and explainable. Trade prices are often private. You want to hide them from the public, show them only to approved accounts, and be able to explain exactly why a given buyer pays a given price when they ask.

    None of these is a discount. Each one is a piece of infrastructure. Bolt five separate plugins together to cover them and you get conflicting price filters, duplicated customer data, and a checkout that behaves differently depending on which plugin got there first. That’s the problem B2B Suite is designed to remove.

    What B2B Suite actually is

    B2B Suite is a single plugin that treats the B2B channel as one system instead of a pile of add-ons. It sits on top of standard WooCommerce — your products, your checkout, your orders — and adds the layer that trade customers need, without asking you to change how the rest of your store works.

    The design goal was simple: the parts of B2B that usually take five plugins and a developer should take one plugin and an afternoon. Everything shares the same data model and the same pricing pipeline, so the features actually cooperate instead of stepping on each other.

    The pieces of a real B2B store

    Here’s what’s in the box, and the job each part does.

    Group and wholesale pricing. Put customers into groups and price for each one — percentage off, a fixed amount off, or a set price. Apply it shop-wide, per product, per category, or right down to a single customer. This is the wholesale-pricing part, done properly and without a second plugin.

    Hidden prices and trade registration. Hide prices (and optionally the “add to cart” button, or whole products) from the public, so only approved trade accounts see them. Take real trade applications with the fields you care about, and approve accounts before anyone sees a number.

    Company accounts. One buying organisation, many people. Sub-users with roles, a shared order history, spend limits, and an approval chain so an order can be reviewed before it’s placed. The company is the customer; the people are how it buys.

    Net terms and credit. Sell on invoice. Set a credit limit per company, track what’s outstanding against a real ledger rather than a spreadsheet, and issue statements. The buyer checks out on terms; you keep control of the exposure.

    Request a quote. A quote basket, a negotiation thread, and per-line prices — then one click turns the agreed quote into a real WooCommerce order at exactly the agreed numbers. No re-keying, no drift.

    Bulk ordering. A fast order pad and quick order by SKU or pasted CSV, so a buyer reordering fifty lines doesn’t have to hunt through your catalogue one product at a time. It’s the feature repeat buyers notice first.

    Tax handling for trade. Tax-exempt customers, and — for EU stores — automatic VAT-number validation and reverse charge, so cross-border trade orders are correct without manual checking.

    One resolver, one audit trail

    Here’s the piece we care about most, because it’s the one that quietly breaks on stores that grew by stacking plugins.

    In B2B Suite, every trade price is decided by a single resolver. When a buyer looks at a product, one pipeline walks through the possibilities in a fixed order — an accepted quote, then a customer-specific rule, then their company, then their group, then a category rule, then any sale price, then the regular price — and the first one that applies wins. That same walk runs everywhere a price is shown: the shop, the cart, the Store API that Checkout Blocks uses, and the explainer.

    Two things fall out of that design:

    The price is consistent. Because one resolver answers every surface, the price a buyer sees on the product page is the price in their cart and the price at checkout. There’s no second plugin applying a different rule further down the line.

    The price is explainable. You can pull up exactly why a given buyer pays a given number — which rule won, and which rules were considered and skipped — because the explanation is generated from the same walk that charges the customer. It can’t drift from what they actually pay. When a buyer emails “why is this $68.40?”, you have a real answer instead of a guess.

    That’s the difference between a bag of price filters and a pricing engine: one pipeline decides the price, everywhere, and can always show its work.

    Free vs Pro: where the line is

    The core plugin is free on WordPress.org, and it isn’t a crippled trial. The free version runs a complete single-group wholesale channel end to end:

    • One customer group with full pricing control (percentage, amount-off, fixed), shop-wide and per product
    • Quantity-break pricing and buy-one-get-one on the same product
    • Hidden prices, trade registration and approval
    • The bulk order form and quick order by SKU or CSV
    • Min/max/pack quantity rules per product
    • PDF invoices, the price explainer, and an importer to bring rules over from other plugins
    • HPOS, Cart & Checkout Blocks, and a clean uninstall

    Pro is an add-on for when your buyers need organisational depth:

    • Unlimited customer groups, plus category, tag and per-customer price rules
    • Private catalogues and per-group visibility
    • Company accounts, sub-users, spend limits and order-approval chains
    • Net terms, credit limits and statements
    • Request a quote, end to end
    • Tax exemption and EU VIES VAT validation
    • Outbound webhooks and more

    Same database, same pricing pipeline. Install free first, add Pro when you need it, and nothing you configured gets thrown away.

    Built for real WooCommerce stores

    A B2B plugin lives at the checkout, which is the least forgiving part of a store. So B2B Suite is built to sit inside modern WooCommerce properly, not fight it:

    • HPOS-ready and tested against both the classic checkout and Cart & Checkout Blocks, including the Store API.
    • Fast on large catalogues — B2B data lives in its own indexed tables, never smeared across postmeta, so pricing stays quick as your catalogue and customer list grow.
    • Translation- and currency-aware, so rules follow WPML/Polylang and multi-currency setups.
    • Clean uninstall — remove it and it takes its own data with it, without leaving orphaned rows behind.

    Boring-sounding things, all of them. They’re also the things that decide whether a plugin is safe to run on a store that’s actually taking money.

    What this blog will cover

    This is the first post, so treat it as the introduction. From here, we’ll write about the parts of B2B on WooCommerce that actually trip stores up — the specific, unglamorous problems, and how to solve them:

    • Getting wholesale-pricing precedence right, so the correct rule wins and you can prove it
    • Running trade registration without drowning in spam applications
    • Setting up net terms you can actually collect on
    • Migrating from another B2B plugin without losing your groups and rules
    • Making company accounts and approval chains match how a real purchasing team works

    Practical, specific, and grounded in how the plugin really behaves — not a feature list dressed up as advice.

    FAQ

    Is B2B Suite free, or is it a trial?

    The core plugin is genuinely free on WordPress.org — not a time-limited trial. It runs a complete single-group wholesale channel on its own. Pro is a separate add-on for stores that need multiple groups, company accounts, credit, or quoting.

    Do I need the free plugin to use Pro?

    Yes. Pro is an add-on: the free plugin owns the database schema and the pricing pipeline, and Pro layers company accounts, credit, quoting and the rest on top. Install free first, then activate Pro.

    Will it work with my checkout?

    Both. B2B Suite is tested on the classic checkout and on Cart & Checkout Blocks, and it’s HPOS-ready, so it works whether you’re on the newer block checkout or the classic one.

    Can it replace the B2B plugin I’m already using?

    That’s the plan. The importer (in the free plugin, not behind the paywall) brings your customer groups and price rules over from other B2B plugins so switching doesn’t cost you the setup you’ve already done.

    When can I get it?

    B2B Suite is in the final stretch before it lands on WordPress.org. Join the waitlist at b2bsuitewp.com and we’ll email you the day it goes live.

    Conclusion

    Selling to businesses on WooCommerce shouldn’t mean gluing five plugins together and hoping they agree with each other at checkout. It should mean one system that understands companies, terms, quotes and approvals — and resolves every price through one pipeline you can actually explain.

    That’s what we’re building B2B Suite to be. The free plugin gives you a complete wholesale channel today; Pro adds the organisational depth when your buyers need it.

    We’re launching soon. Join the waitlist and we’ll tell you the moment it’s live — one email, then you decide. Real B2B deserves better than a discount table. Let’s build it.

  • Spectra Image Block: How to Add AI Alt Text, SEO File Names

    Spectra Image Block: How to Add AI Alt Text, SEO File Names

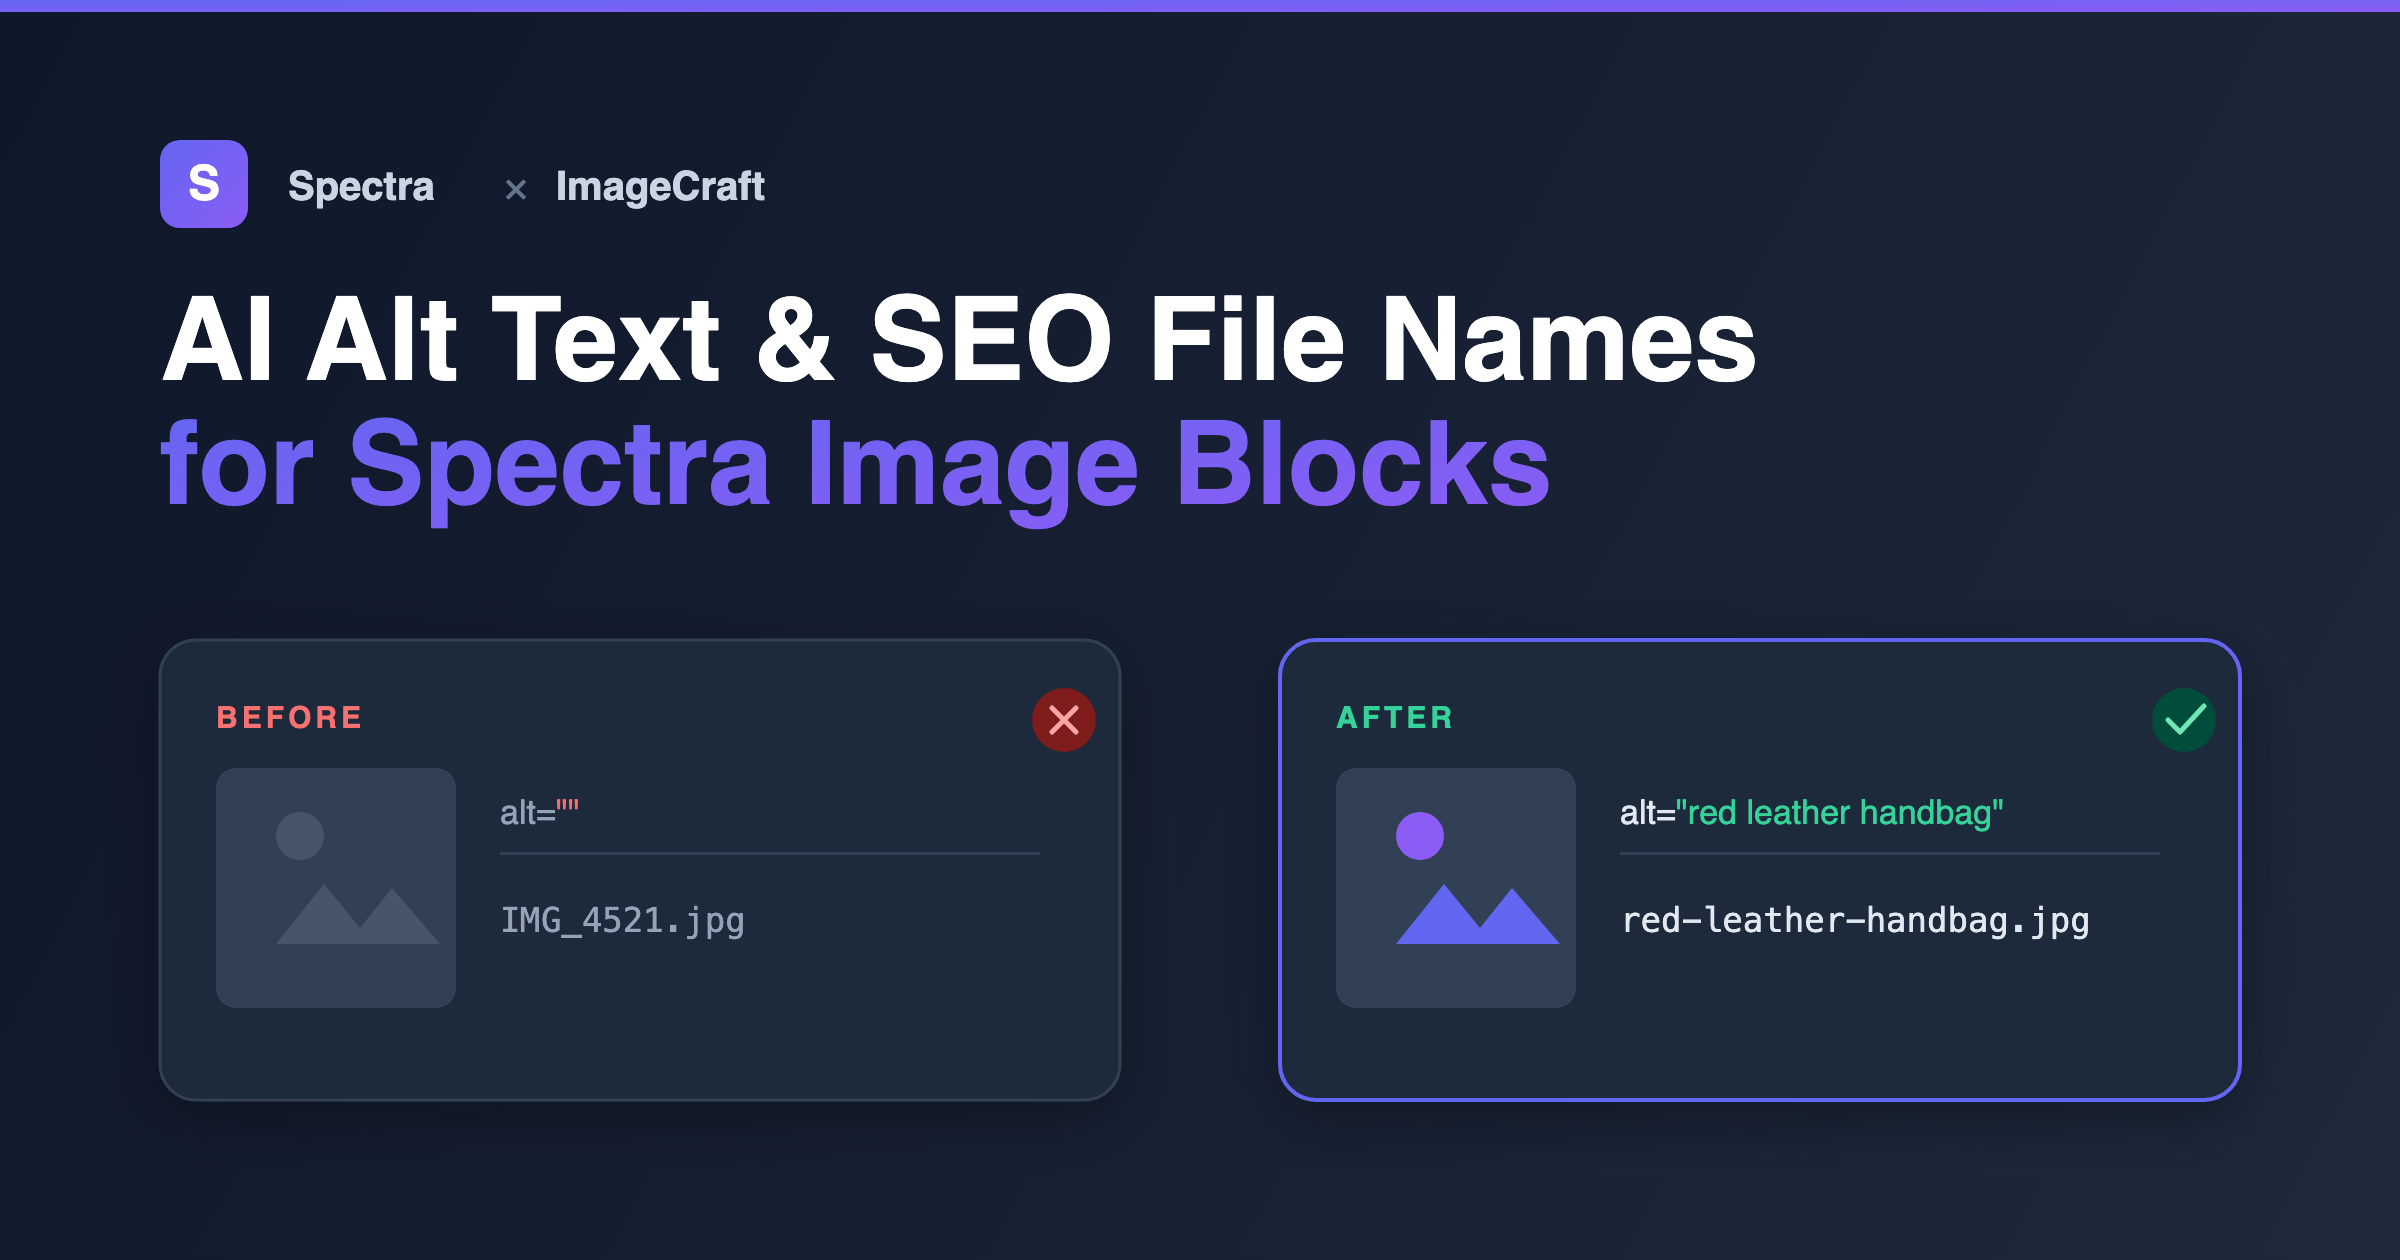
    A Spectra layout can look flawless and still quietly hurt your SEO and accessibility. Every Image block you place pulls from your media library — and if those images have empty alt text and file names like IMG_4521.jpg, search engines and screen readers see every flaw the editor hides. ImageCraft fixes that at the source.

    Why Spectra and ImageCraft work so well together

    The Spectra Image block doesn’t store its own copy of an image — it references an attachment in your WordPress media library and pulls that image’s alt text and file URL from there. ImageCraft works at exactly that level. So you don’t optimize images inside Spectra; you optimize them once in the media library, and every Spectra block using that image inherits the result automatically.

    Optimize an image once with ImageCraft, and every Spectra Image block that uses it gets accessible alt text and an SEO-friendly file name — with no block re-editing.

    Method 1: Optimize first, then insert into Spectra (recommended)

    This is the cleanest workflow for any new page or post — get the image right in the media library, then build your Spectra layout on top of polished assets.

    1. Upload your image to the media library.
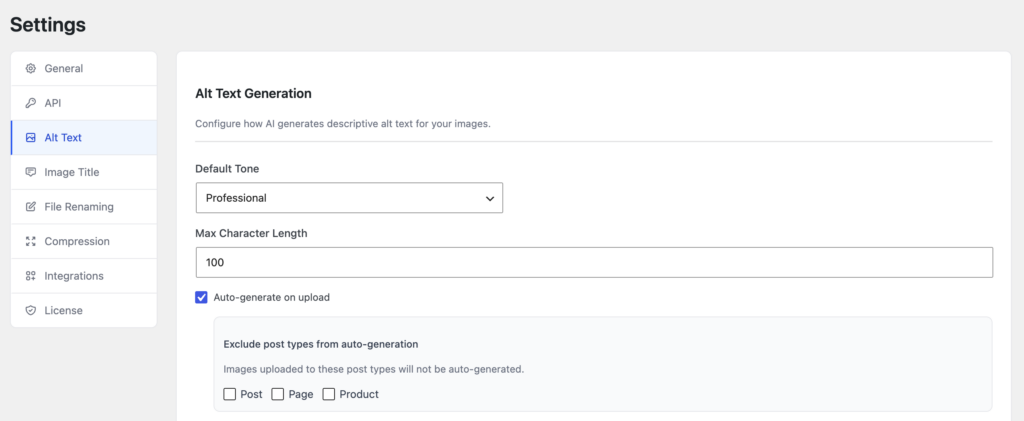
    2. Turn on auto-generate alt text. In ImageCraft → Settings → Alt Text, enable Auto-generate on upload so every new upload gets AI alt text automatically.
    3. Rename the file for SEO. In ImageCraft → Scanner, click Rename to turn DSC_0099.jpg into something like red-leather-handbag.jpg — safely updating the file and its URL.
    4. Add the Spectra Image block and select your optimized image. The alt text and clean file name come along automatically.

    Prefer a particular wording? In Settings → Alt Text you can pick a tone (Professional, SEO, Casual, Technical) and a max length — and the Spectra block displays whatever alt text ImageCraft saved.

    Method 2: Already built the page? Fix existing images in bulk

    If your Spectra blocks are already live with missing or weak alt text, you don’t need to touch the blocks at all. Because they reference the media library, fixing the image there updates the block automatically.

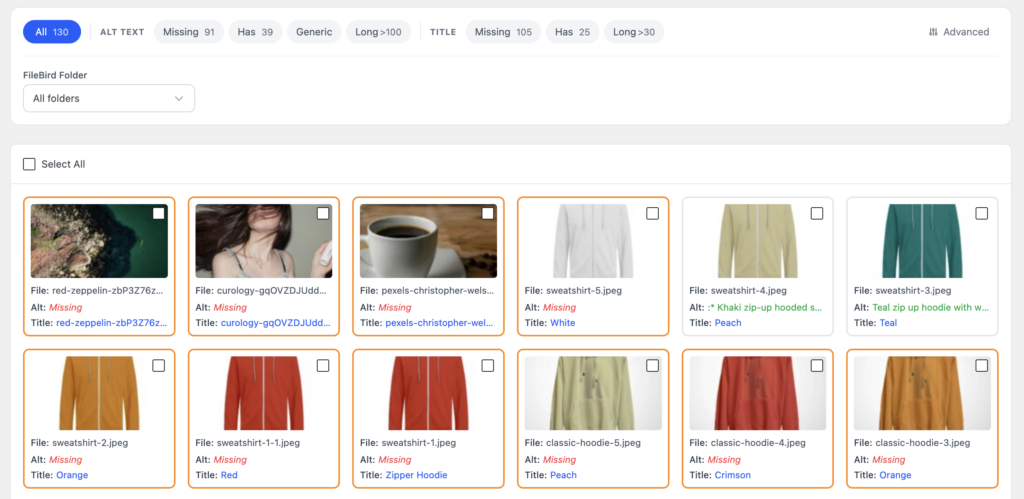
    1. Open ImageCraft → Scanner — it flags every image with missing or generic alt text, including the ones used in your Spectra blocks.
    2. Select the images (or Select All) and click Generate.
    3. Review the AI suggestions and Accept them in bulk.
    4. Reload your page — the Spectra Image blocks now show the new alt text, with no block re-editing.

    For very large libraries, use the Batch screen — it processes hundreds of images in the background, so you can fix an entire site’s worth of Spectra images in one run.

    Frequently asked questions

    Does ImageCraft change the Spectra block itself?

    No. ImageCraft only optimizes the underlying media library attachment — its alt text and file name. The Spectra Image block simply reflects those values when it renders, so there’s nothing to re-edit inside Spectra.

    Will renaming a file break the image in my Spectra block?

    No. ImageCraft updates the attachment’s file and URL references safely, so your Spectra block keeps pointing at the correct new URL.

    Do I need to re-insert images after generating alt text?

    No. Spectra reads alt text live from the attachment, so accepting AI alt text in ImageCraft updates what the block outputs automatically.

    Does this work with Spectra galleries too?

    Yes. Any block that pulls from the media library — Spectra’s Image and gallery blocks included — benefits from the optimized attachments.

    Get started

    ImageCraft is free to install and works alongside Spectra, Gutenberg, Kadence, WooCommerce, Yoast SEO, Rank Math, AIOSEO, SEOPress, and FileBird. Optimize your images once in the media library, build your Spectra layout on top, and every Image block ships SEO-ready — without writing a single line of alt text by hand.

    Ready to make every Spectra image count? Get ImageCraft →

  • Meet ImageCraft: AI Alt Text, File Renaming & Image SEO for WordPress

    Meet ImageCraft: AI Alt Text, File Renaming & Image SEO for WordPress

    Images make your WordPress site beautiful — but to search engines and screen readers, an image without alt text is invisible. Writing descriptive alt text for hundreds of images by hand is the kind of task everyone knows they should do and almost nobody finishes. ImageCraft fixes that with AI.

    What is ImageCraft?

    ImageCraft is a free, open-source WordPress plugin that generates accurate, human-quality alt text for your images using AI — then takes it further with SEO-friendly file renaming and a full image-SEO audit. It works with the new WordPress 7.0 native AI Client, or you can bring your own Anthropic Claude, OpenAI GPT-4o, or Google Gemini API key.

    The plugin itself is completely free. If you bring your own key, you only ever pay your AI provider directly — there’s no middleman.

    Why alt text matters

    Alt text does double duty. For accessibility, it’s how screen-reader users understand your visuals — and in many regions it’s a legal requirement. For SEO, it’s how Google understands your images, powering image-search traffic and reinforcing the relevance of the page they live on. Missing or generic alt text (“image1.jpg”, “DSC_0042”) quietly costs you both.

    What ImageCraft does

    AI alt text in 65+ languages

    Generate natural, descriptive alt text in English, Spanish, French, German, Japanese, Chinese, Arabic, Hindi, Tamil, Korean, and 55+ more — with 7 tone options (Professional, Casual, Technical, SEO, and three WooCommerce-specific tones), or your own custom prompt.

    Media library scanner & SEO audit

    Scan your entire media library with smart filters — date range, file size, alt-text quality, and missing or generic-alt detection. The SEO Audit Dashboard shows exactly how many images need attention and suggests fixes.

    Batch processing & auto-generate on upload

    Fix a backlog of hundreds of images in a single run with chunked processing and live progress tracking. Going forward, ImageCraft can auto-generate alt text in the background every time you upload — with an optional preview before it’s accepted.

    SEO file renaming

    Beyond alt text, ImageCraft can rename the underlying image files based on the generated description, so DSC_0042.jpg becomes something search engines can actually read.

    WooCommerce-aware

    For stores, ImageCraft generates alt text for product featured images and galleries using context-aware prompts that include the product name, category, and SKU — turning your catalog images into a search asset.

    Built to be safe and simple

    Your API keys are encrypted at rest with AES-256-CBC and stored in your own database. Nothing is sent to third parties except the AI provider you choose. A guided setup wizard gets you running in minutes: pick a provider, paste your key, and start generating — then track daily usage, acceptance rates, and estimated costs from the Usage Statistics panel.

    Get started

    ImageCraft is free to install and works alongside Yoast SEO, Rank Math, AIOSEO, SEOPress, WooCommerce, Gutenberg, Kadence, Spectra, and FileBird. Install it, run a media-library scan, and watch your accessibility and image-SEO scores climb — without writing a single line of alt text by hand.

    Ready to make every image count? Get ImageCraft →